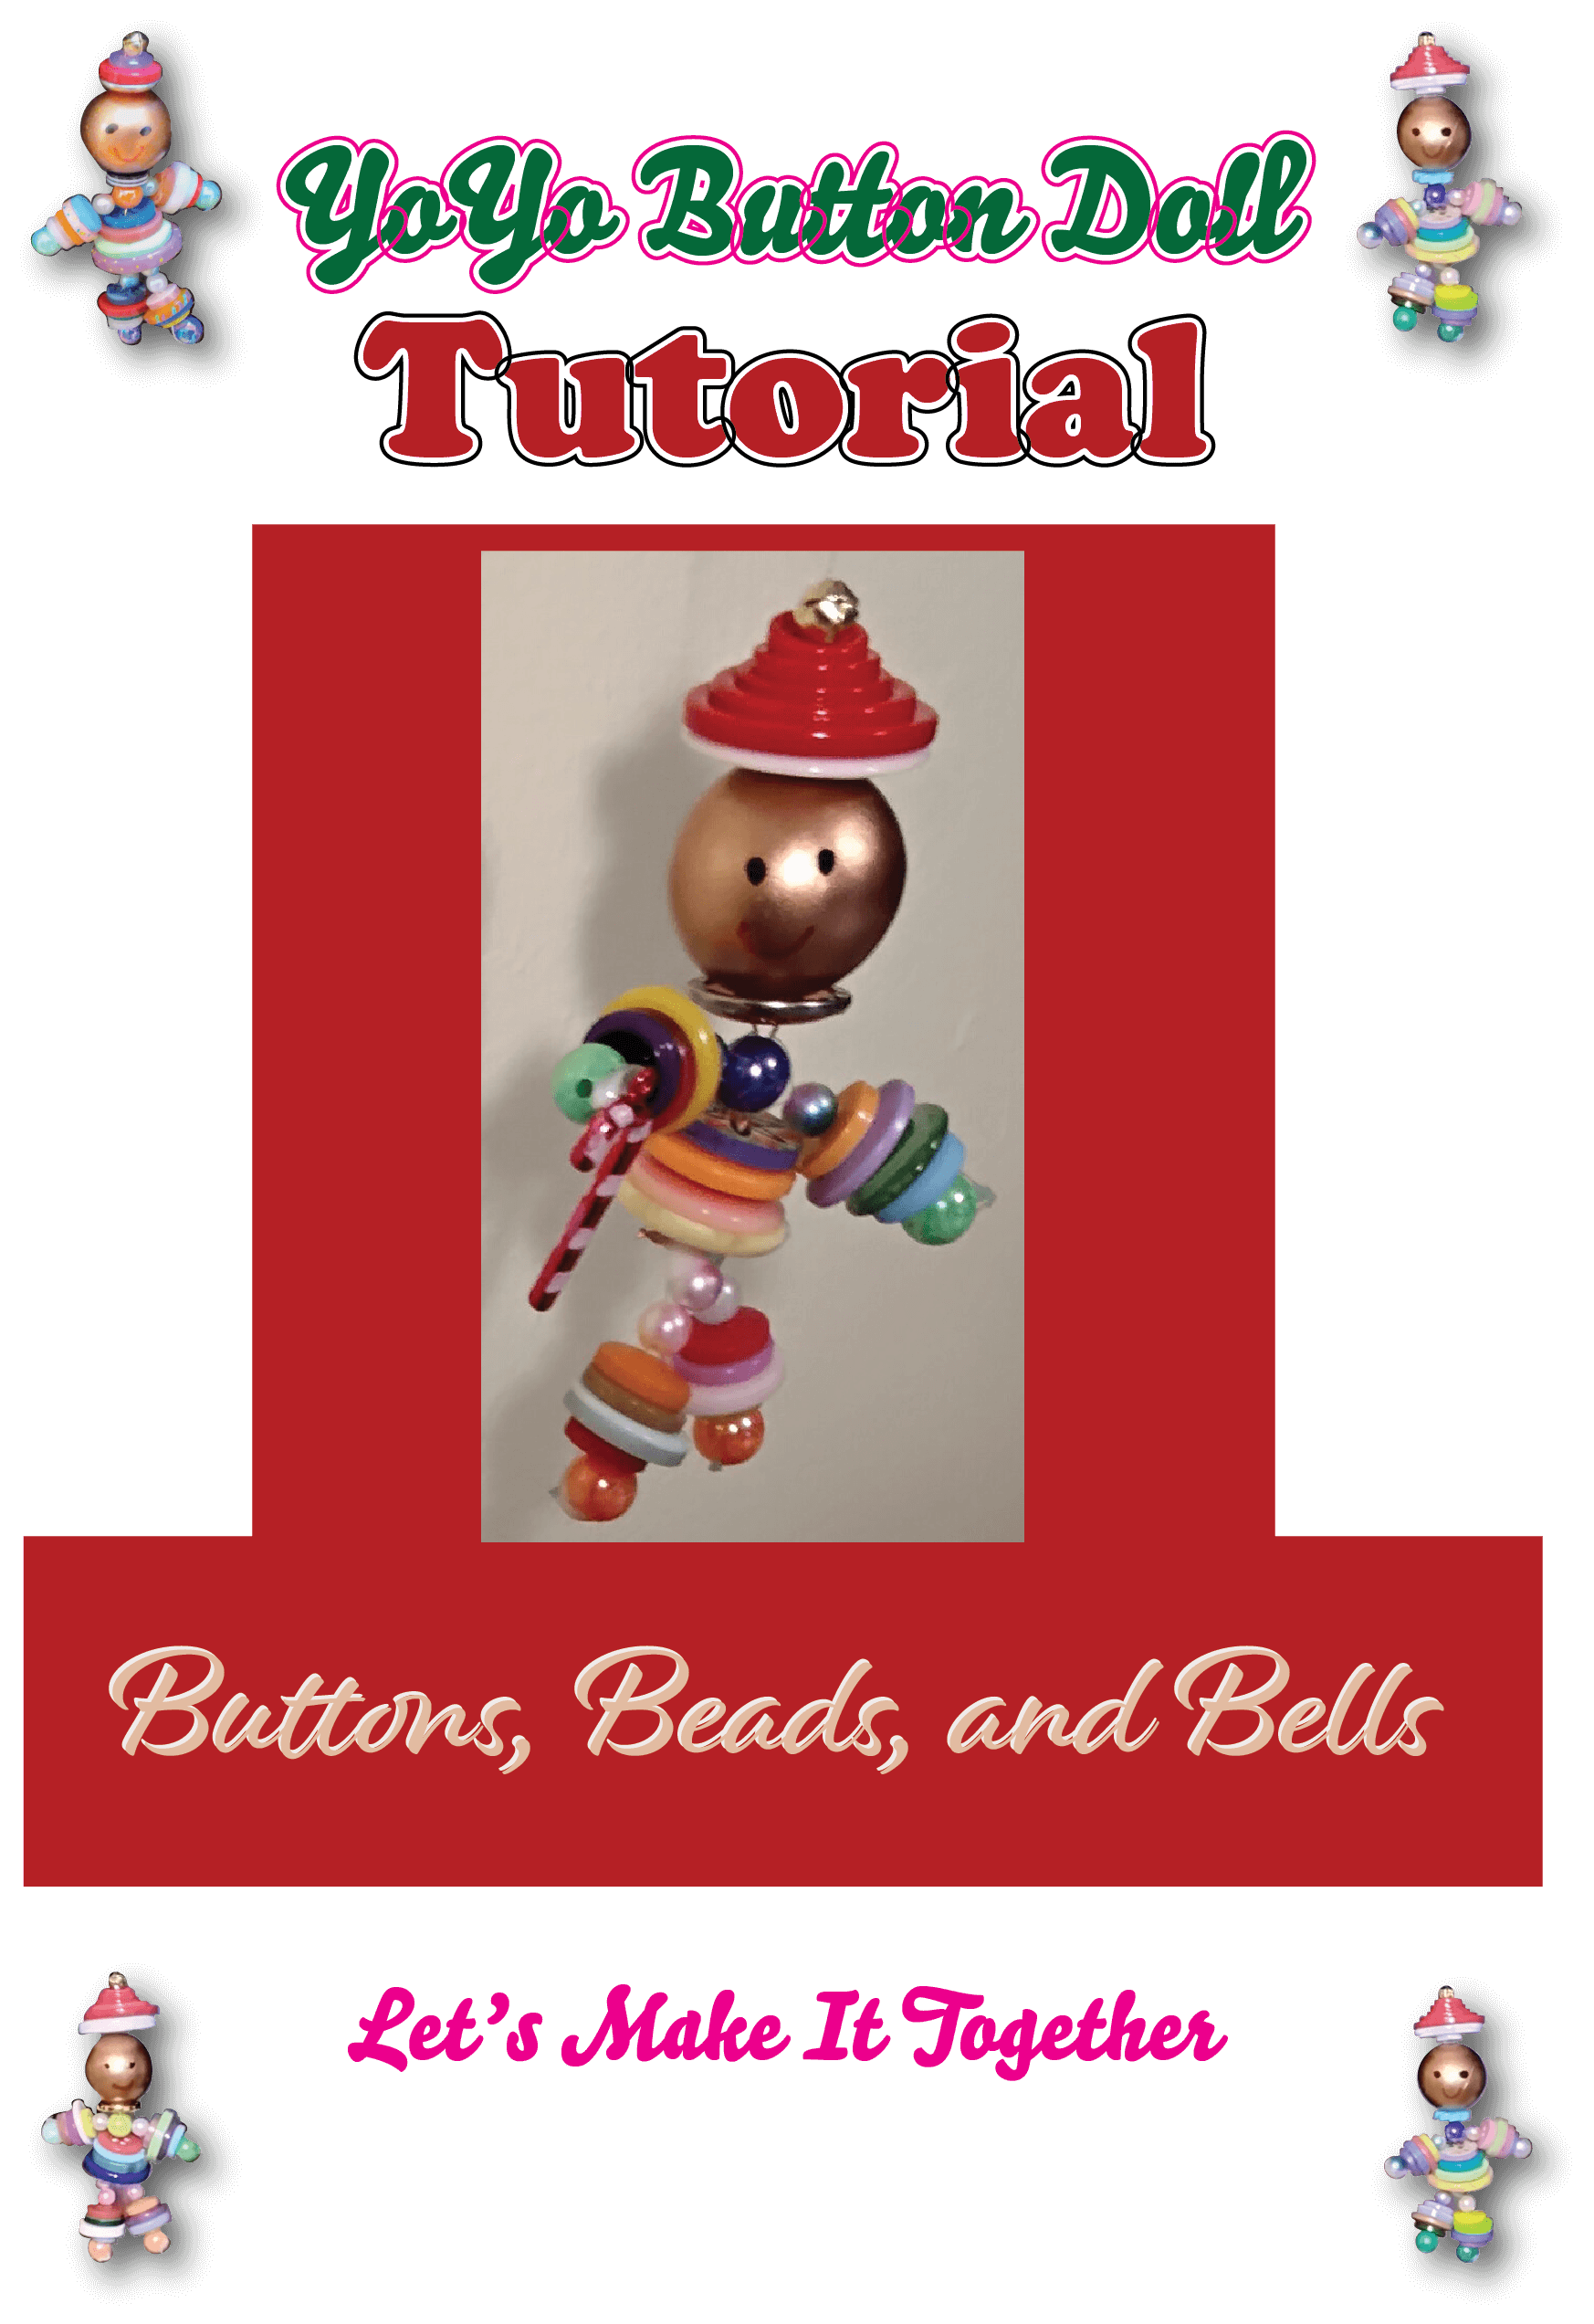
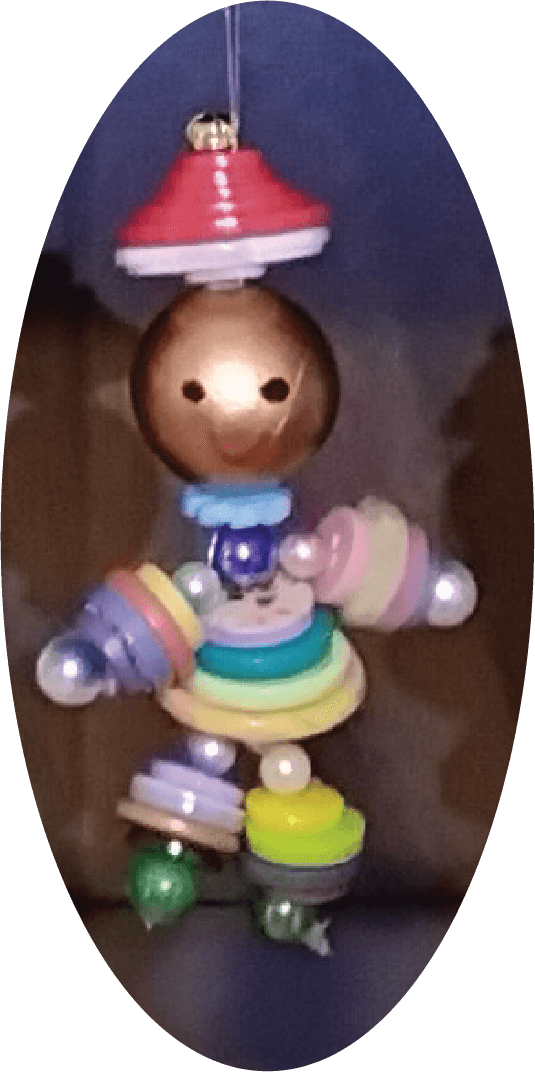
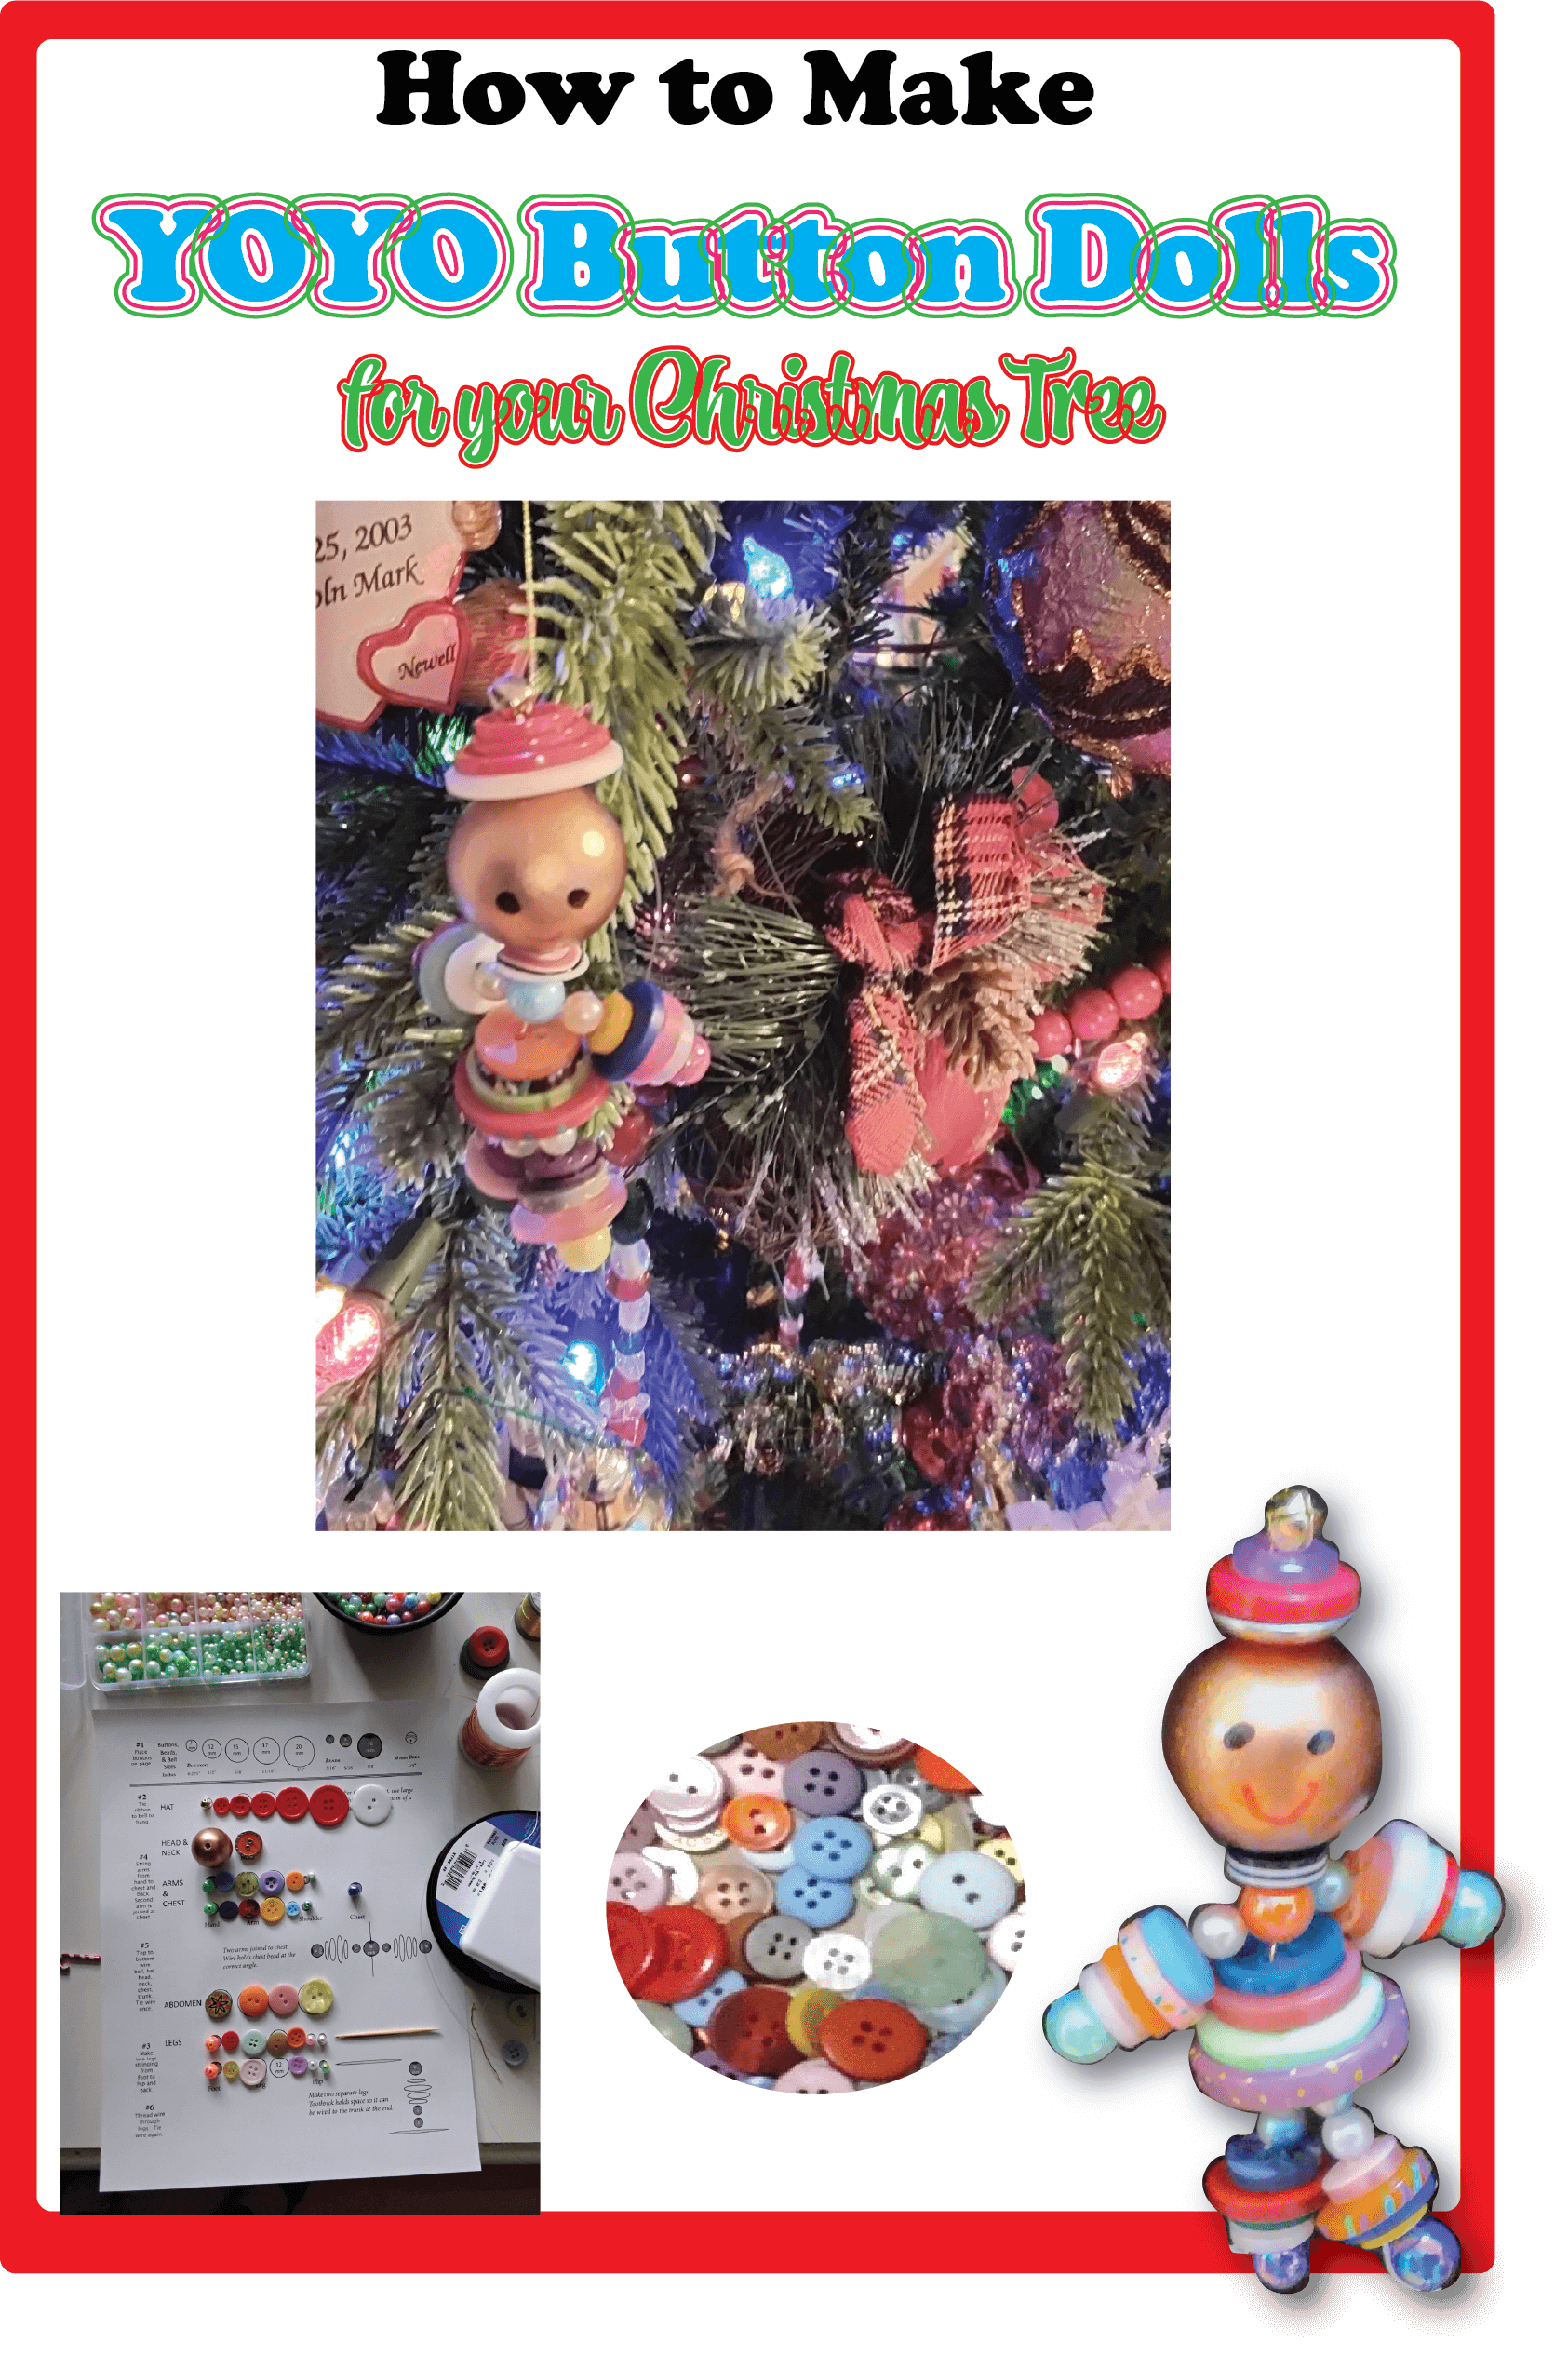
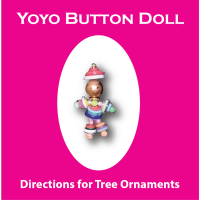
YoYo Button Dolls
Yoyo Button Dolls are a combination of a yoyo doll and a button doll.
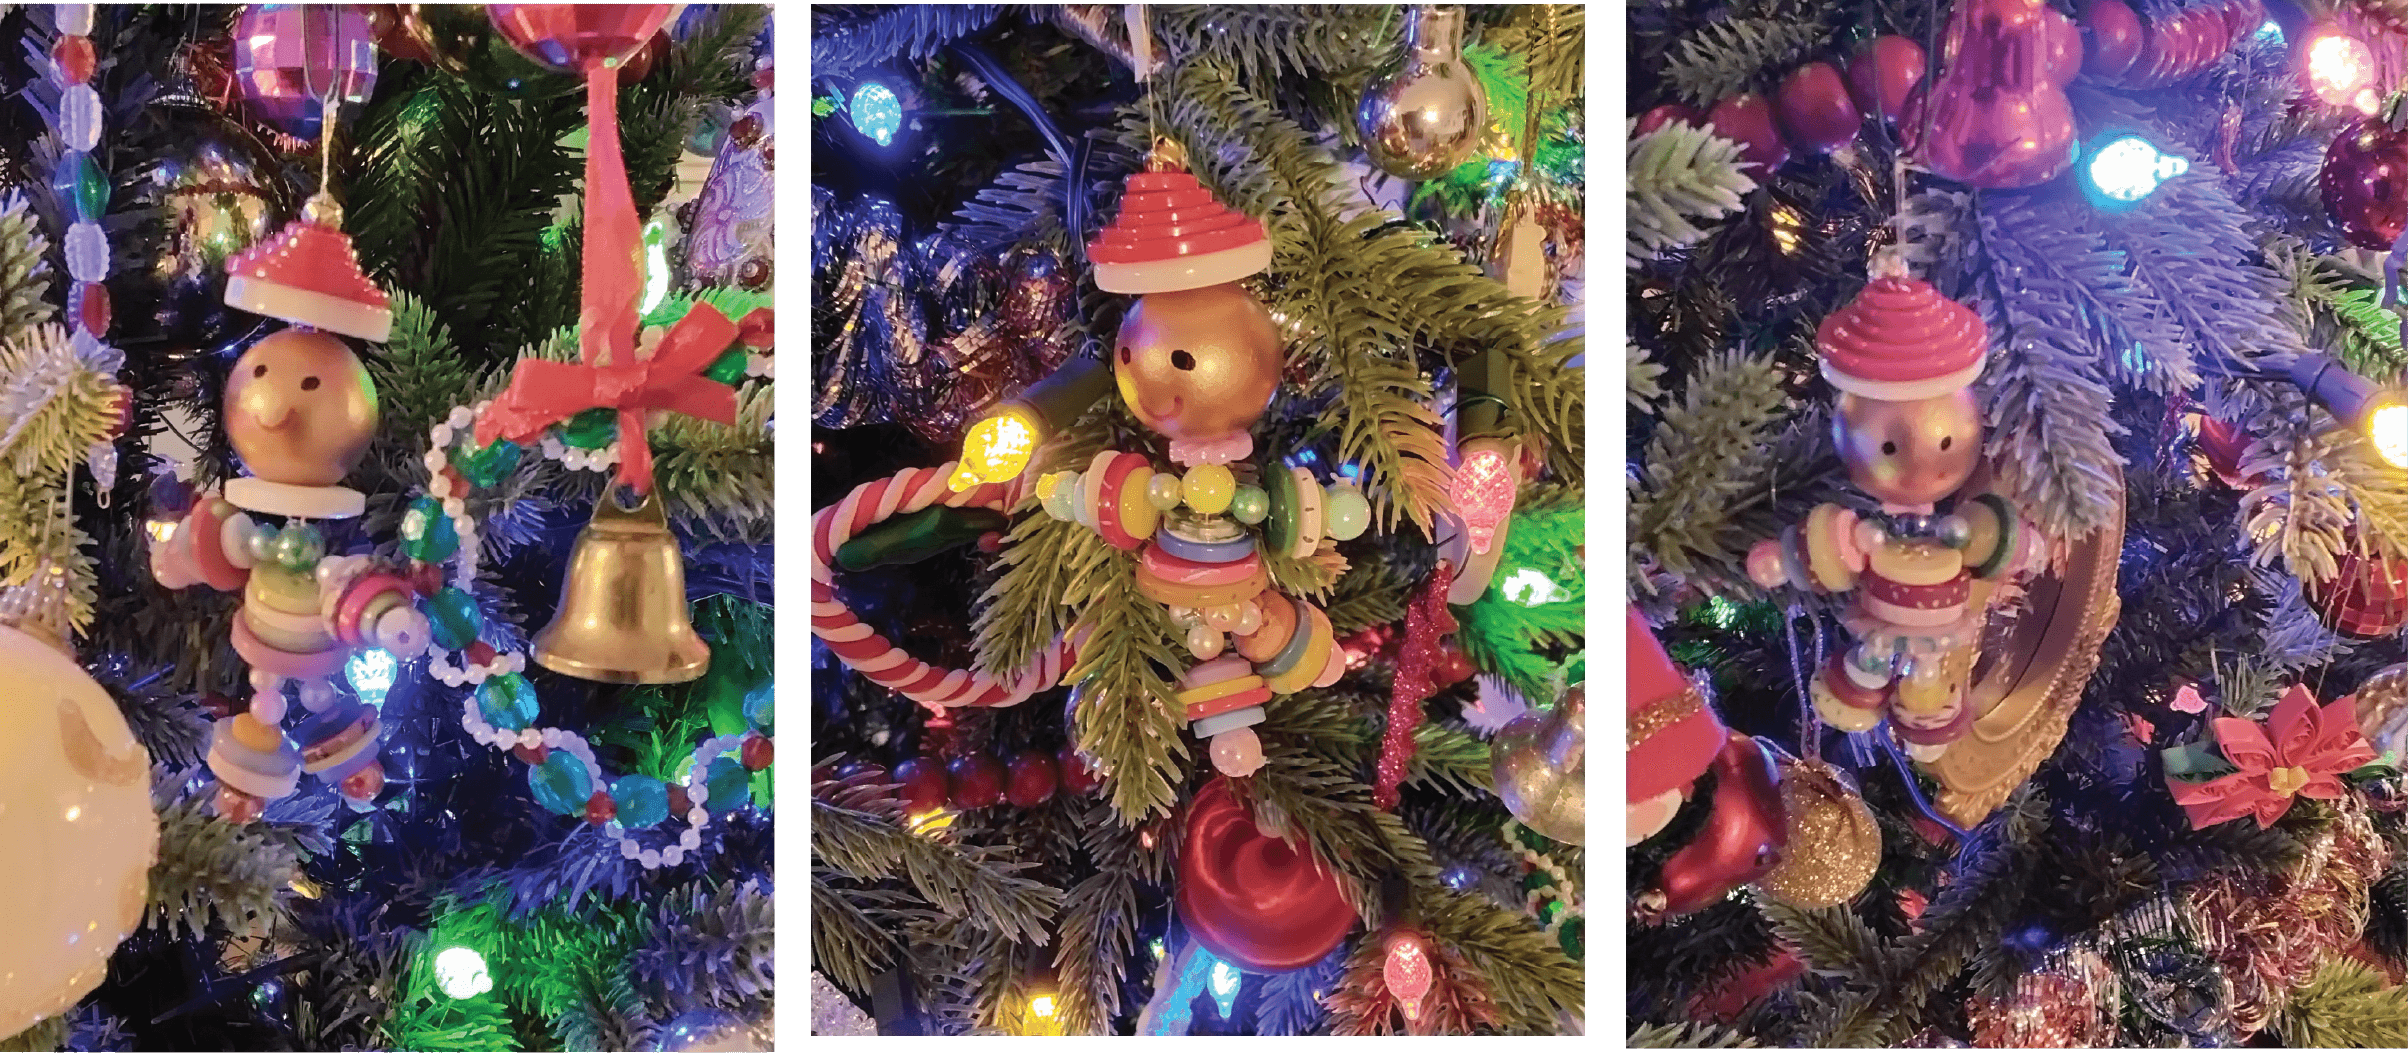
They can be made as Christmas tree ornanents, gift tags, key chains, or other decorations.
Here's how to make them!
This Year's Christmas Craft Challenge
A YoYo Button Doll!
What Is a Yoyo Doll?
To a quilter, a yoyo is a circle cut from cotton fabric. A yoyo doll, then, is a doll made from these quilted yoyos.
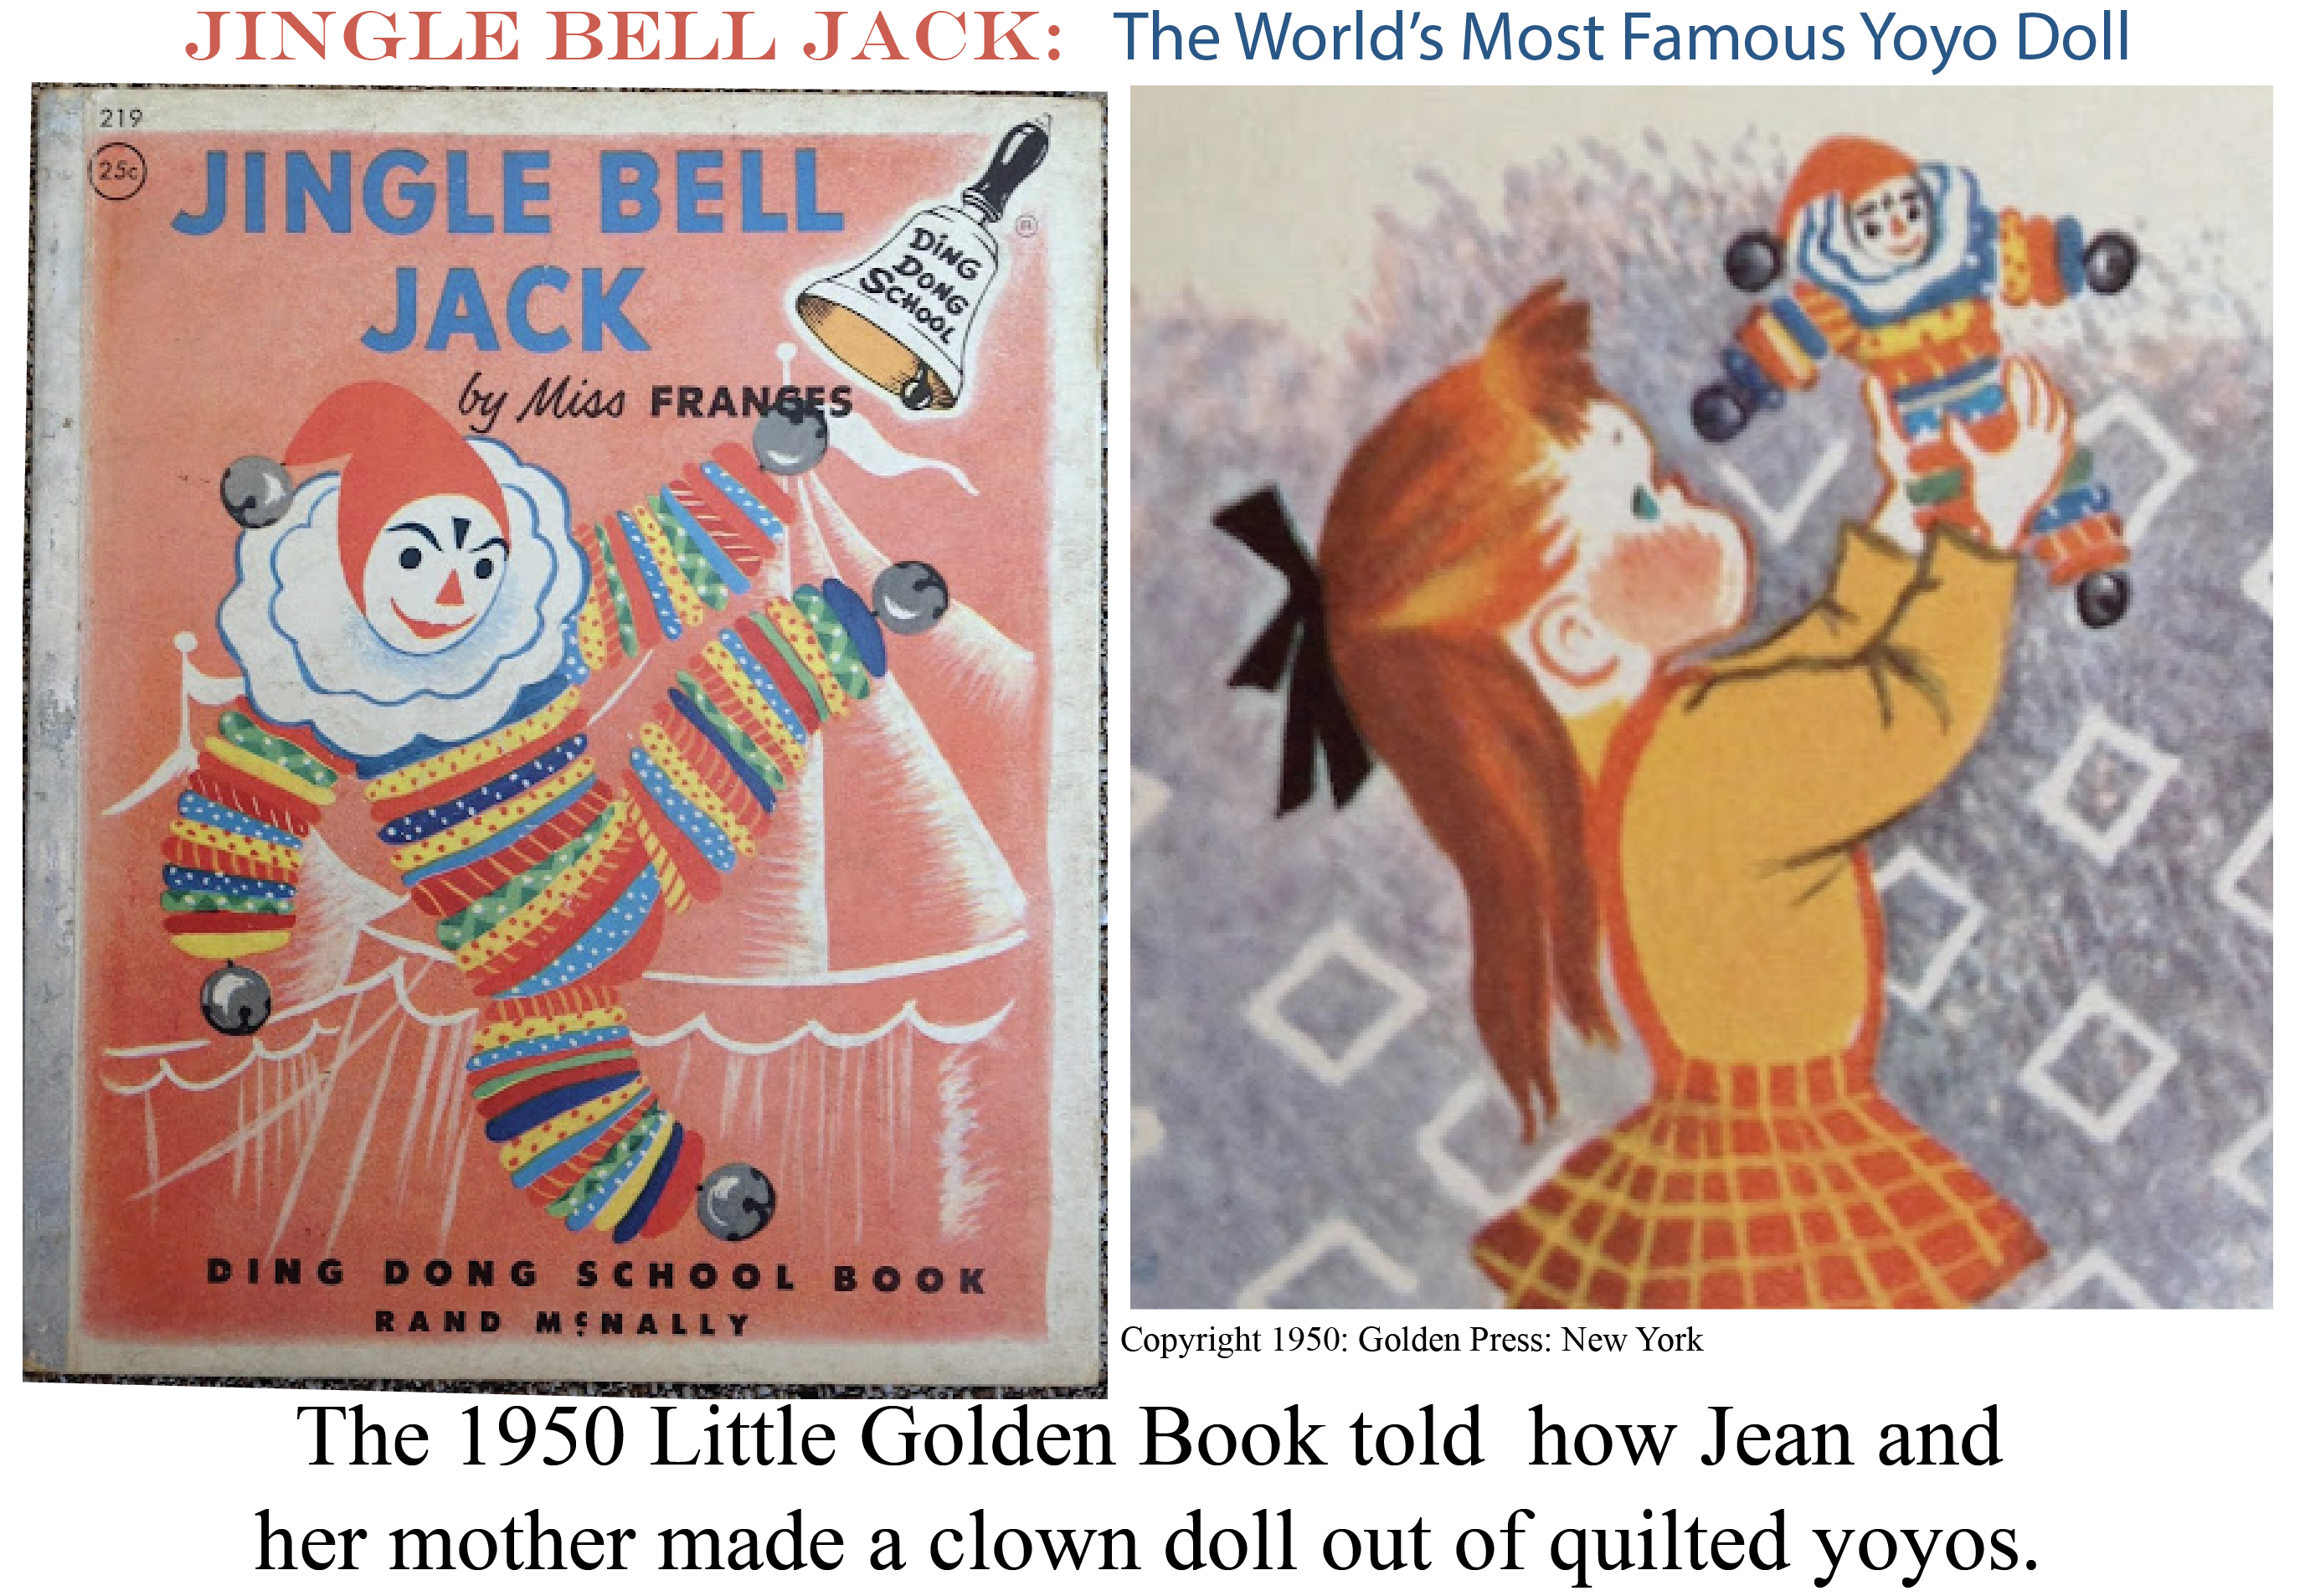
I remember sitting on the floor of my mother's sewing room many years ago reading the book. I assumed (wrongly) that as a matter of course my mother would make me a yoyo doll.
An Internet search will bring up a variety of other yoyo dolls: most of them clowns. Like other clown figures, some seem dark and creepy. But I will always think of little Jean's happy clown with cheerful circus colors.
Button Dolls
Button dolls are a newer crafter-creation. They are small ornamental objects made out of - you guessed it - buttons!The buttons - like the yoyos of old - are made from a variety of colors.
What Makes Our Yoyo Button Dolls Unique?
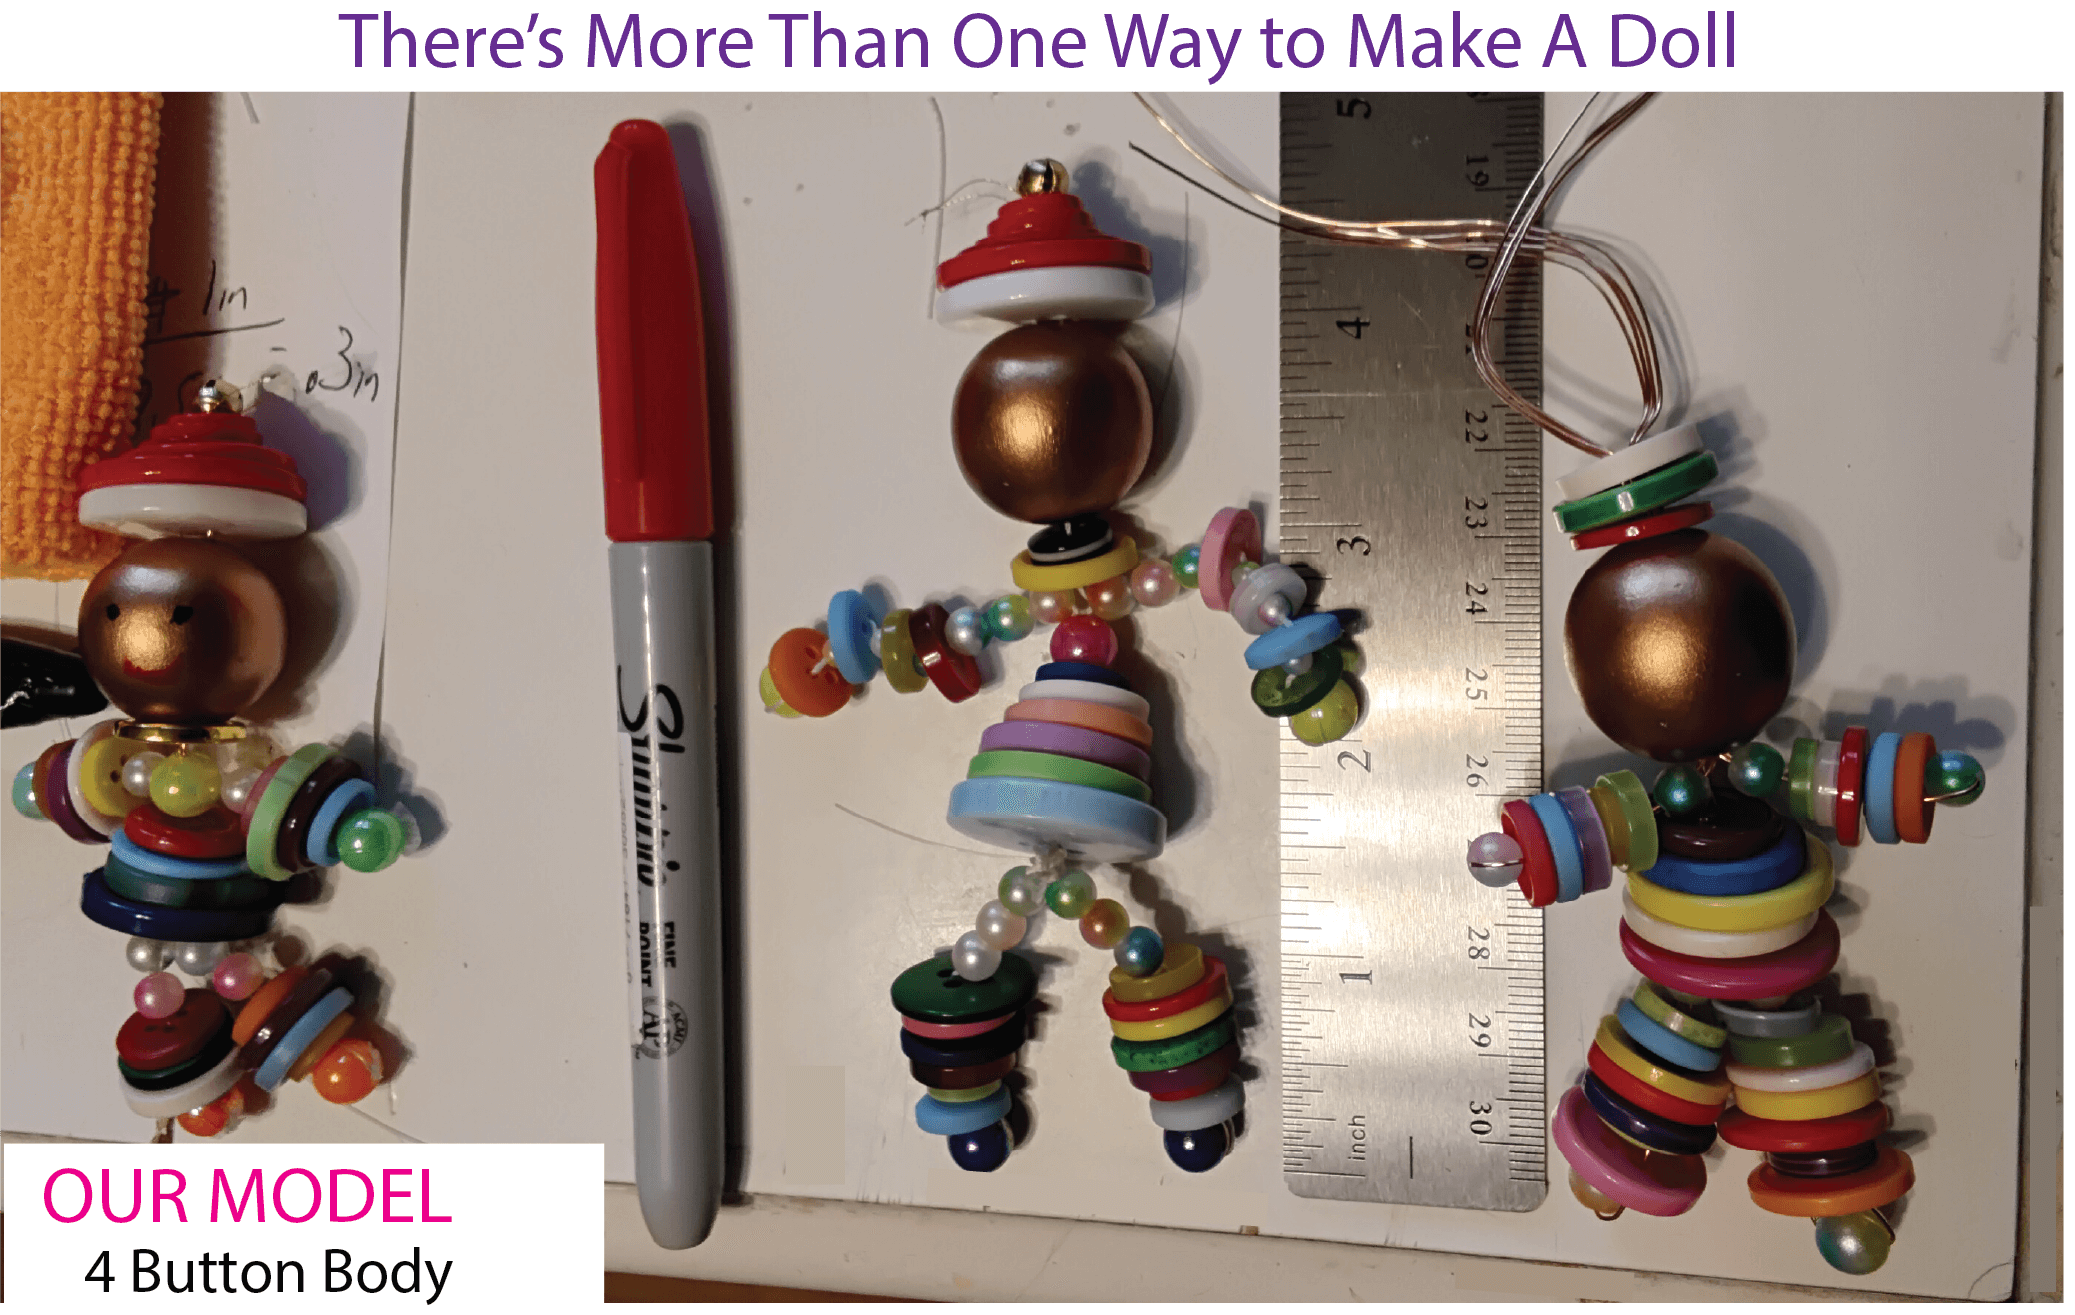
With this year's Christmas ornament selected, all I had to do was order a bunch of buttons, and find directions for making button dolls. Right?Wrong. I tried multiple different models, and each had their own unique advantages as well as unique challenges. (No desire whatsoever to detract from the button dolls made by others.)
It took multiple attempts, and LOTS of buttons before I came up with my model doll. Full directions for our yoyo button doll are given below. It wasn't exactly a fortune that I invested but between multiple trips to stores and numerous on-line orders, I spent a lot more than expected for making a little doll out of buttons.
Hopefully, you will be spared that expense.
Size

It's size is also determined partly by what materials it is made out of.
Spine
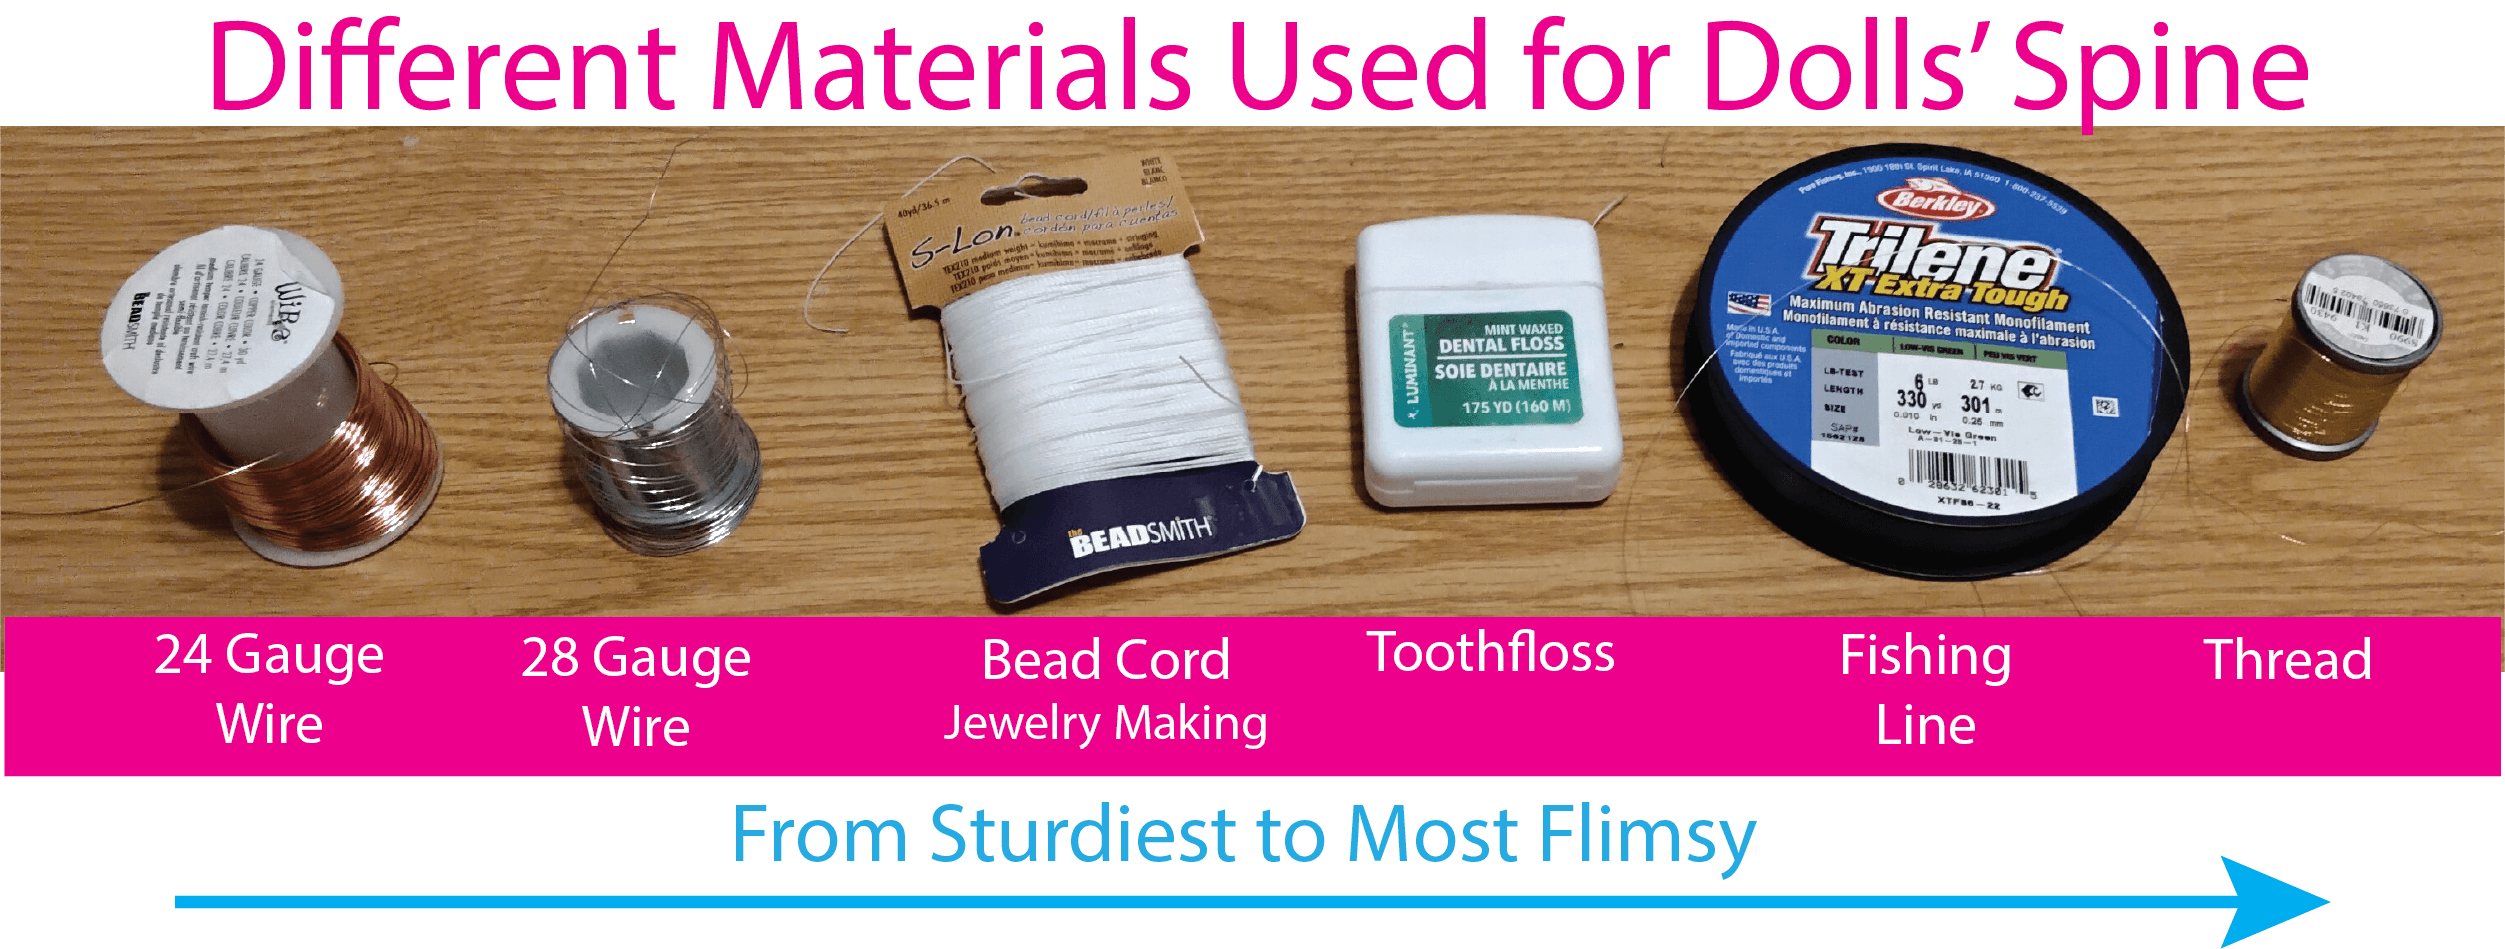
- 24 gauge wire
- 28 gauge wire
- Jewelry bead cord
- Toothfloss
- Fishing line
- Thread
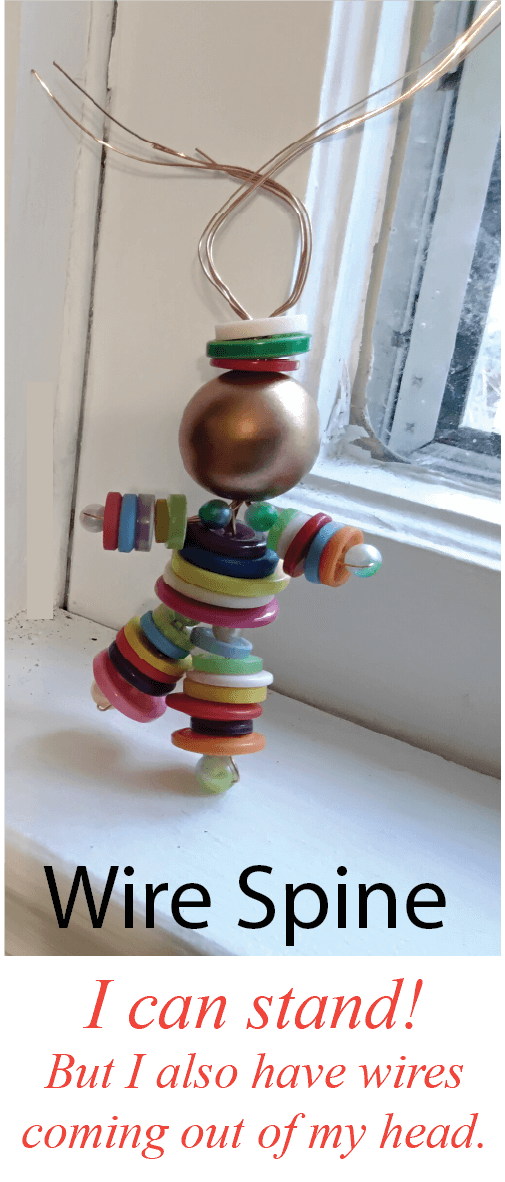
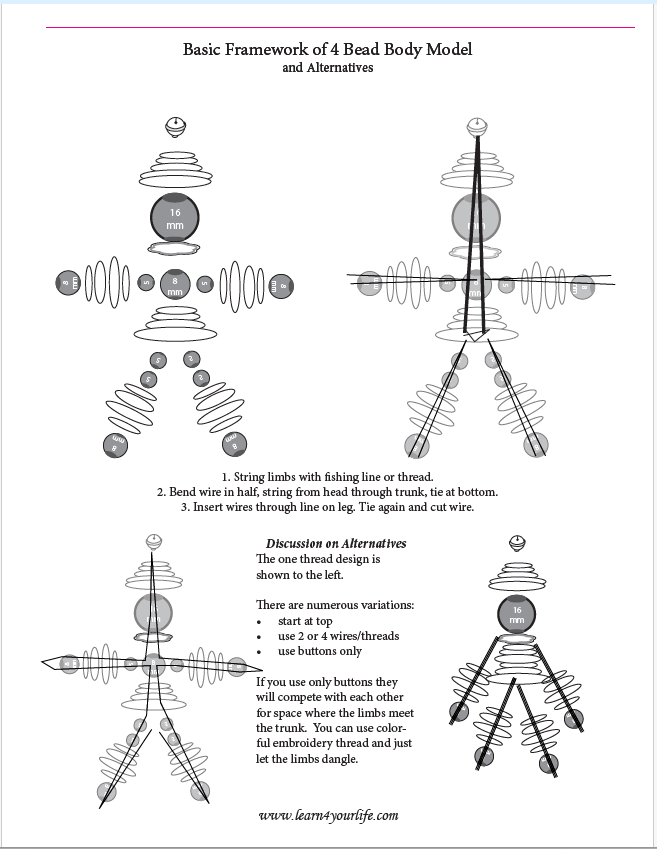
So why not make all the button dolls out of 24 gauge wire? First of all he's got a whole lot of wires coming out of his head. That doesn't look too ornamental to me.
Second, the thicker wire is a bit difficult to bend going back through the arms and legs. The wires get kinks in them as they bend.
So then, why not use the least sturdy materials and make it easier?
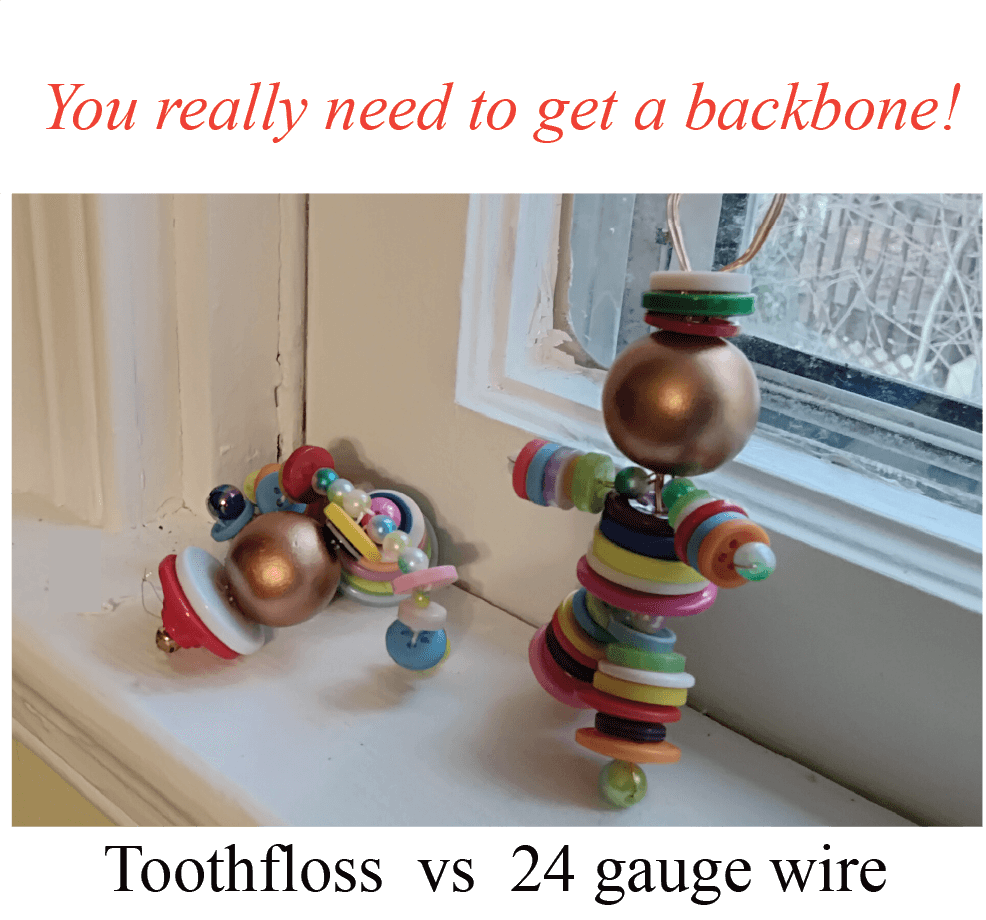
- 24 gauge wire for the spine - (It gives the best support.)
- Fishing wire for arms and legs - (It's flexible for weaving back through the buttons on the limbs.)
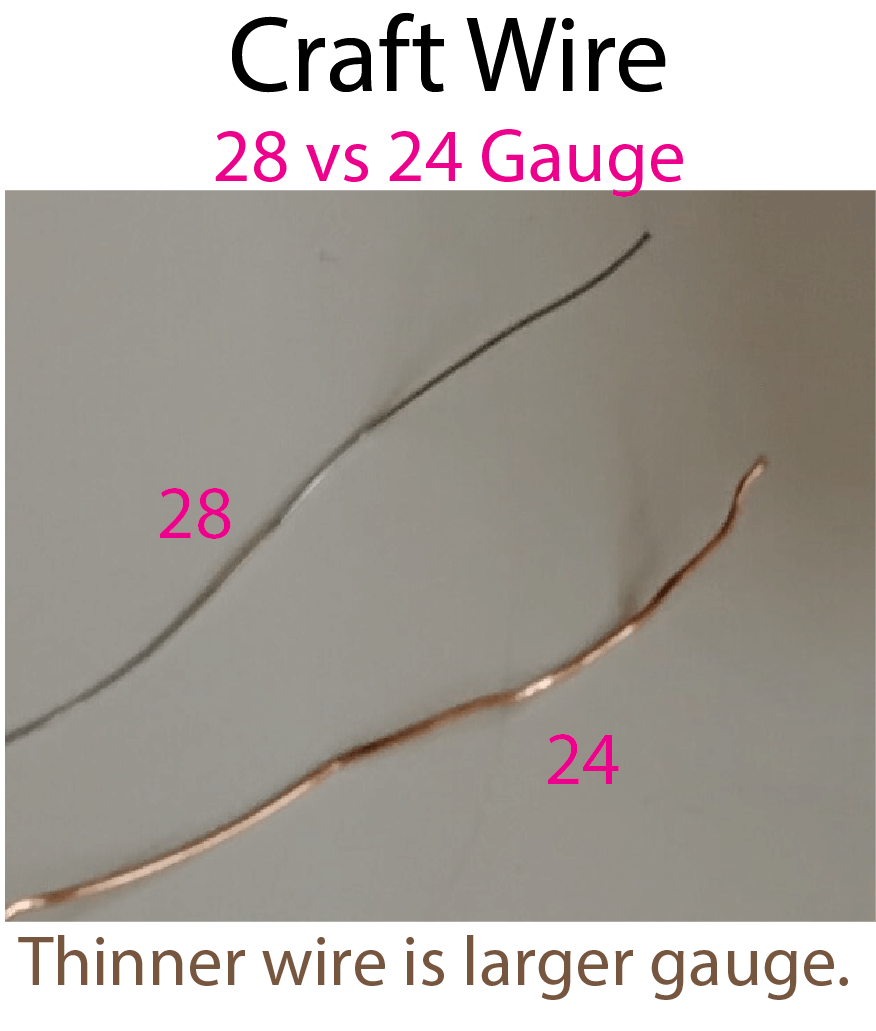
Note About Gauge
But the opposite is also true: it's a bit unwieldy to weave the arms while not giving much strength to the backbone. It's largely a matter of personal preference.
For comparison, the 28 gauge is a little thinner than your average twisty-tie on store-bought bread. The 24 gauge is a bit thicker than the twisty. (Yeah, I know. It's confusing. Whose idea was it to give the thinner wirer a larger measurement? There's an actual historical reason for the reversal, but I just tell myself the wire-making people are a little too wired.)
Beads and Buttons
Most button dolls run into a problem when the arms are joined to the body. The direction of the buttons on the arm are perpindicular to the buttons on the trunk. The doll will either have an open space for the chest (which is heartless) OR you have to pull the material so hard that you risk breaking it. After all that work you are left with buttons bouncing across the floor.
Here's another awkward problem with the all-button button doll: the two legs coming together usually don't fit under the last button of the trunk. The poor thing ends up with very chunky thighs.
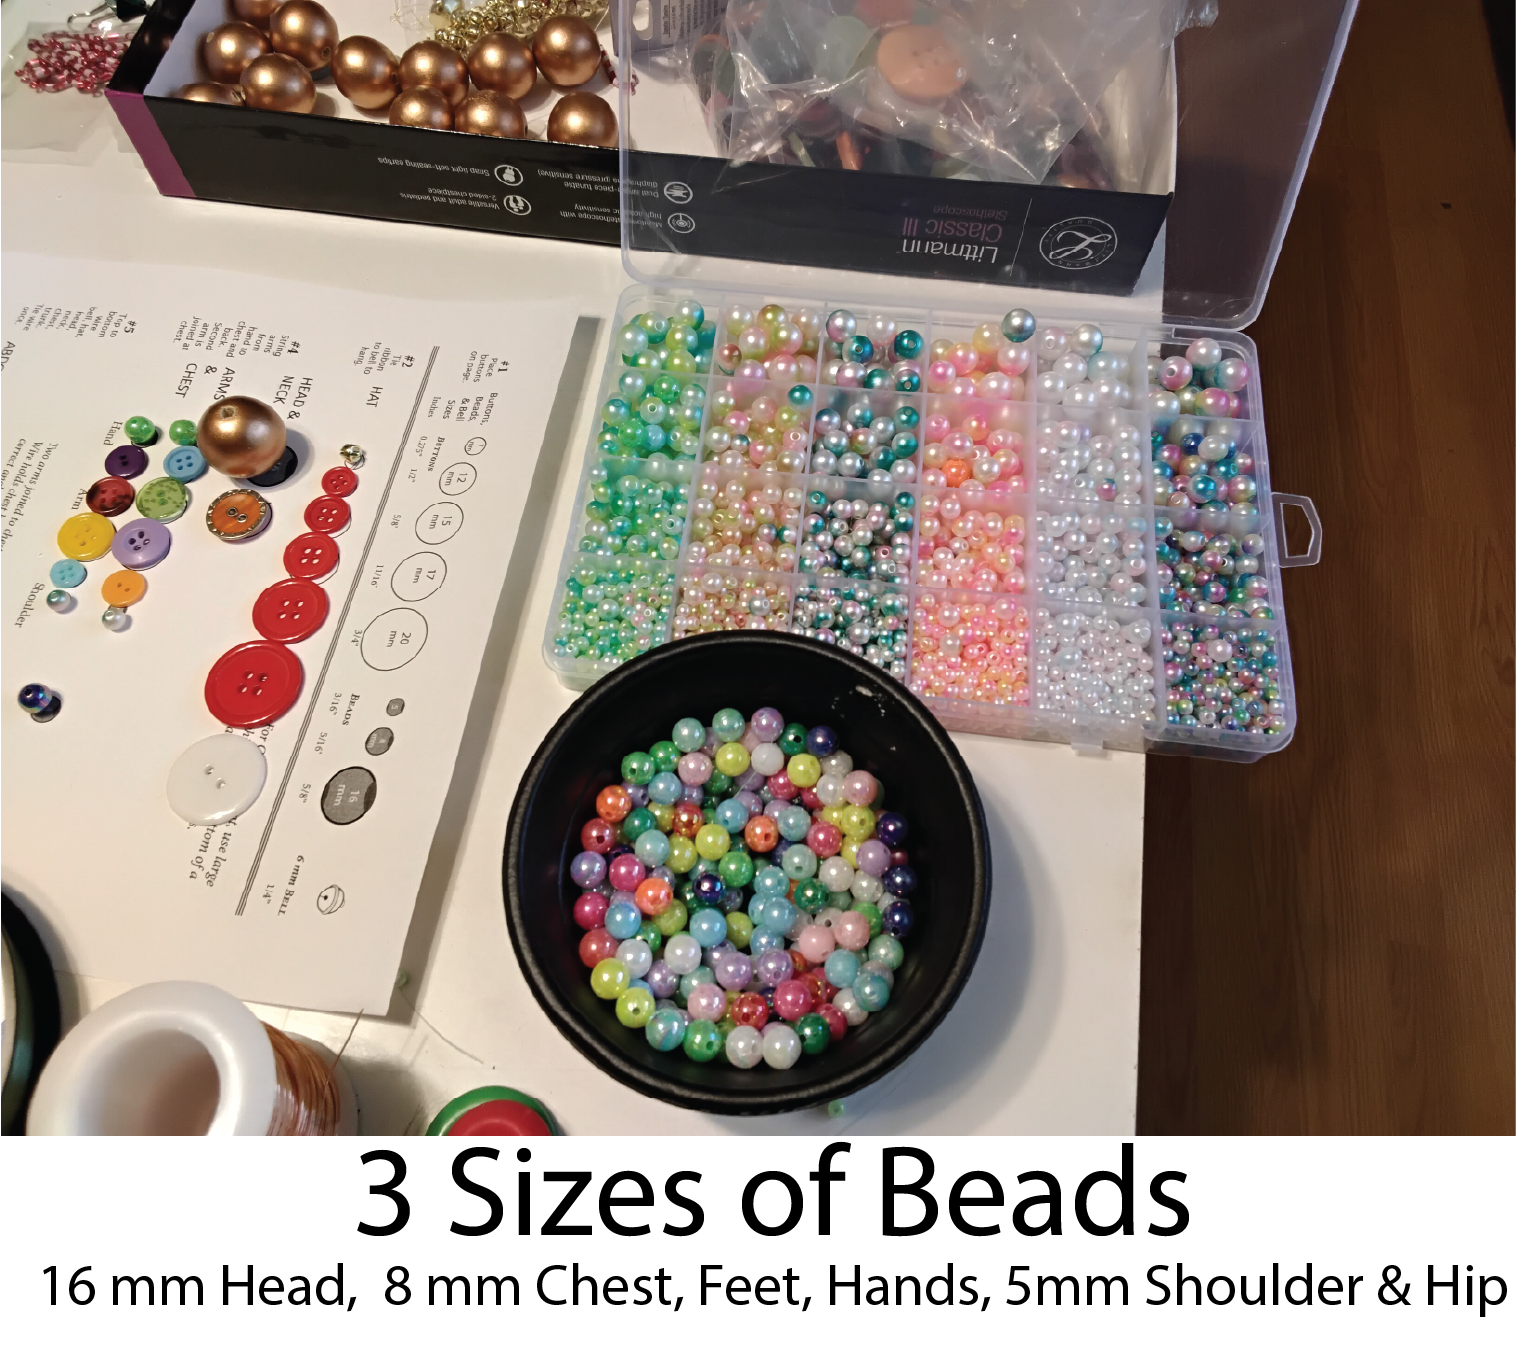
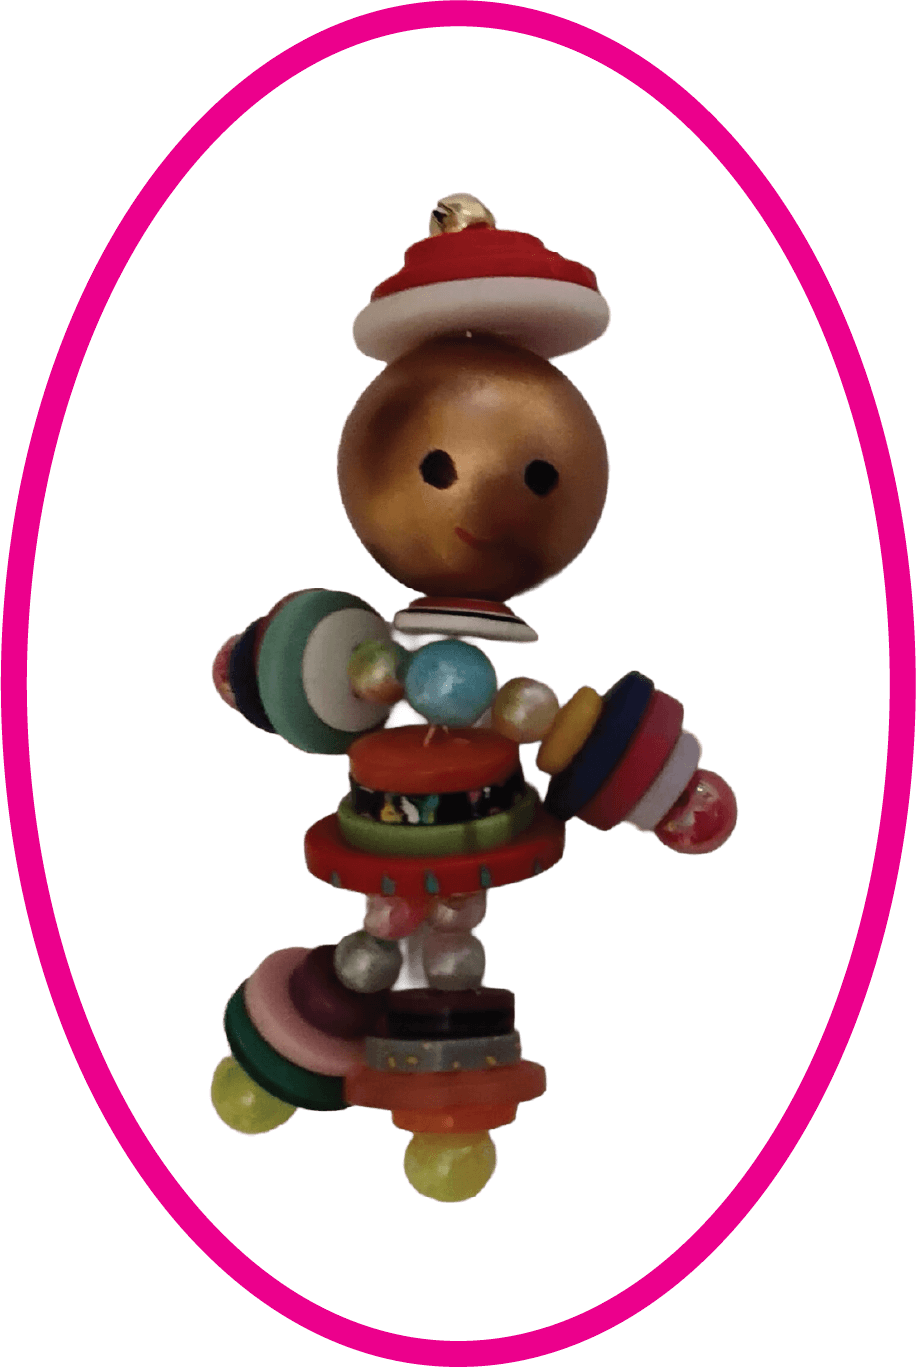
Since beads are usually used for the heads, hands, and feet of many button doll patterns, we just extended their use. In this doll, beads are also used for the chest where the arms and trunk meet. Beads also give extra flexibility where the arms and legs join the trunk so they hang more naturally.
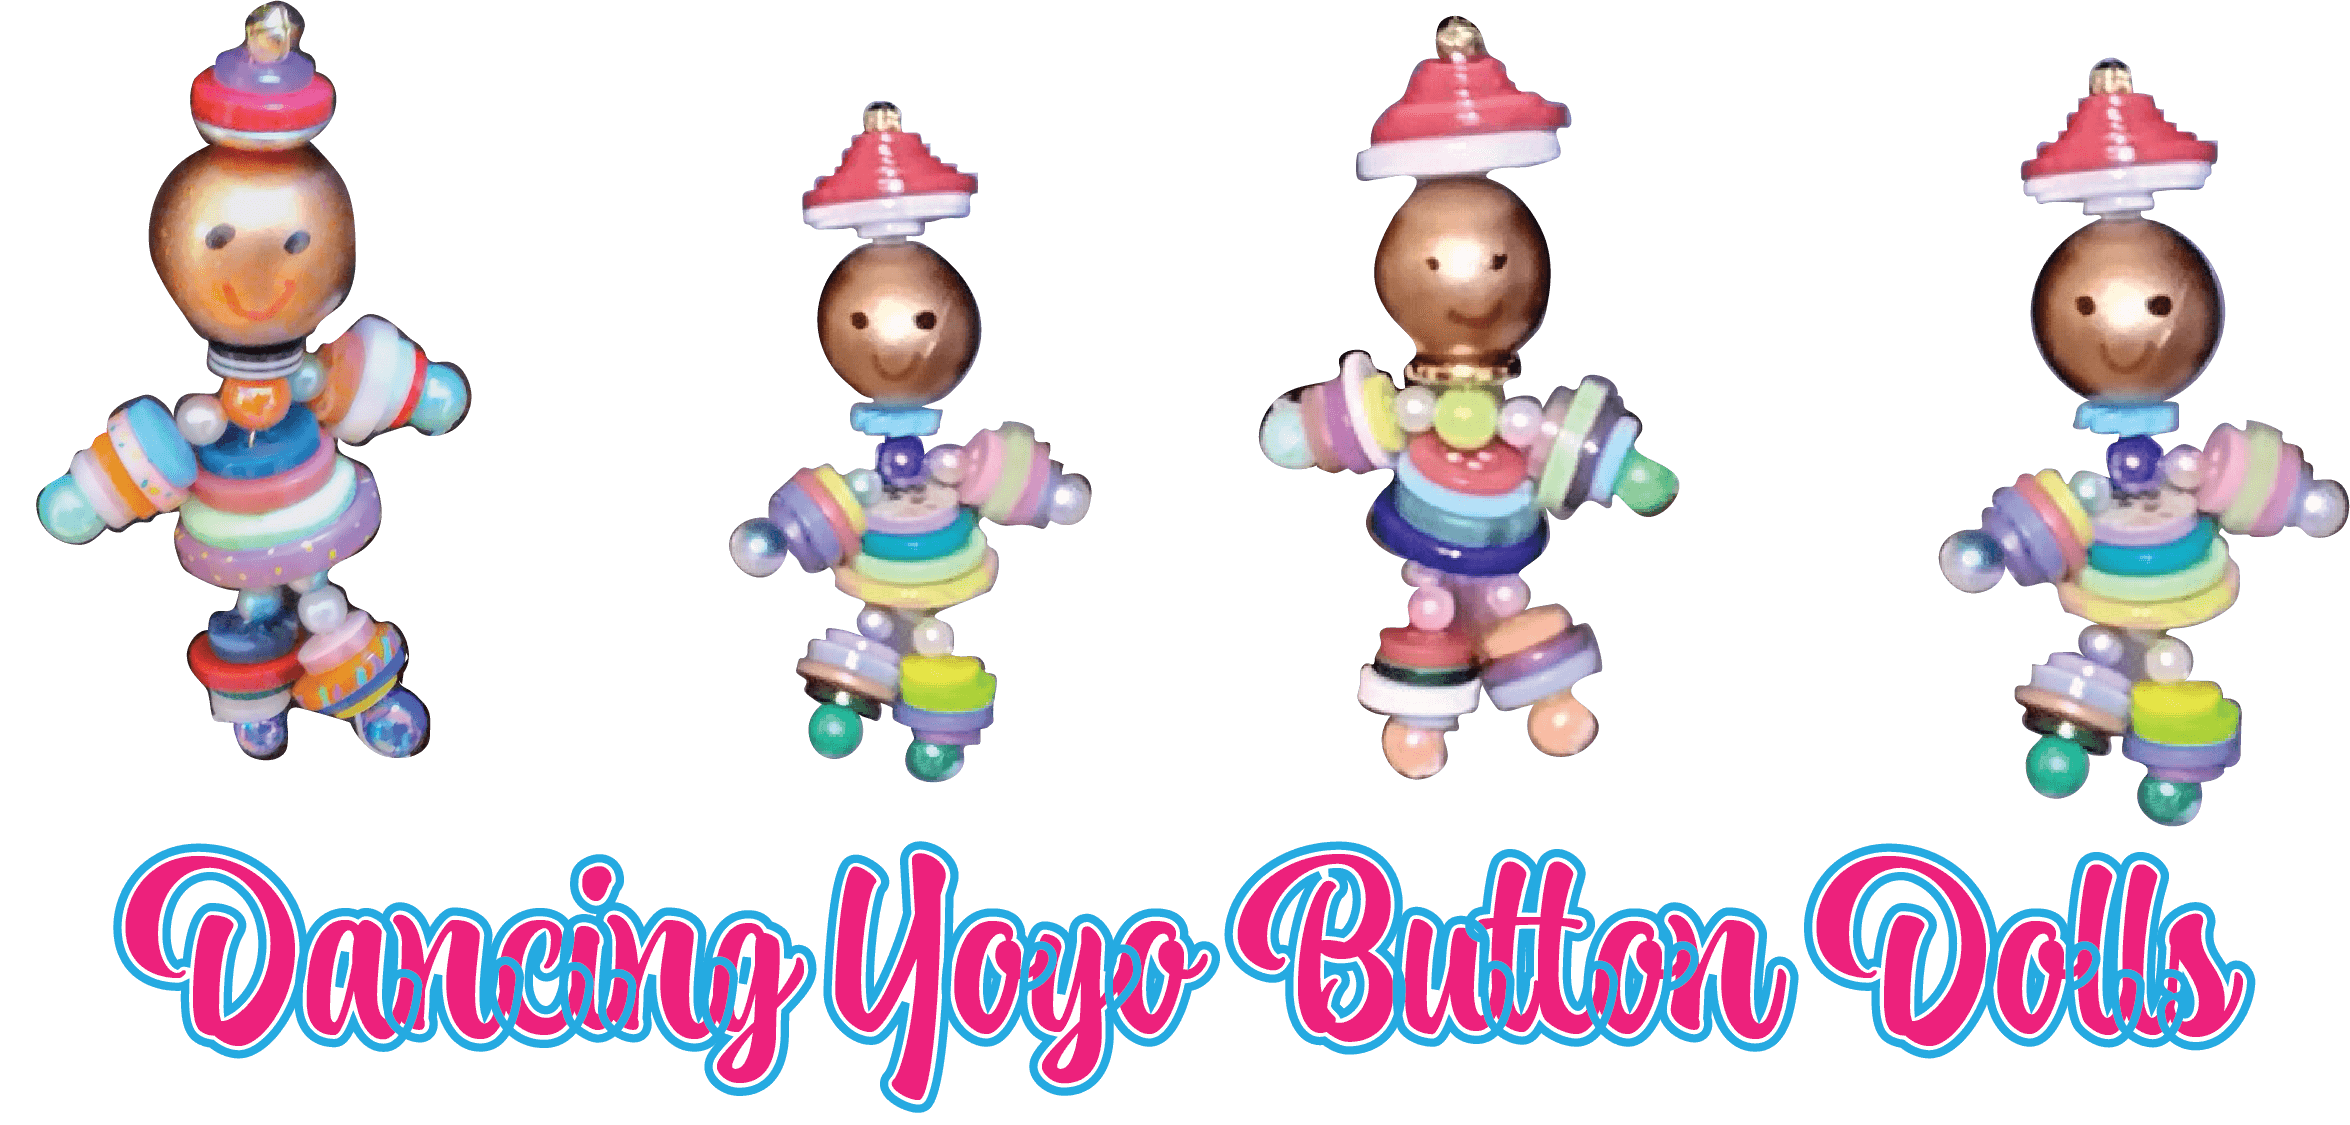
The Four Button Body Doll
Materials Needed for Your Button Doll
Buttons! Buttons! and More Buttons!
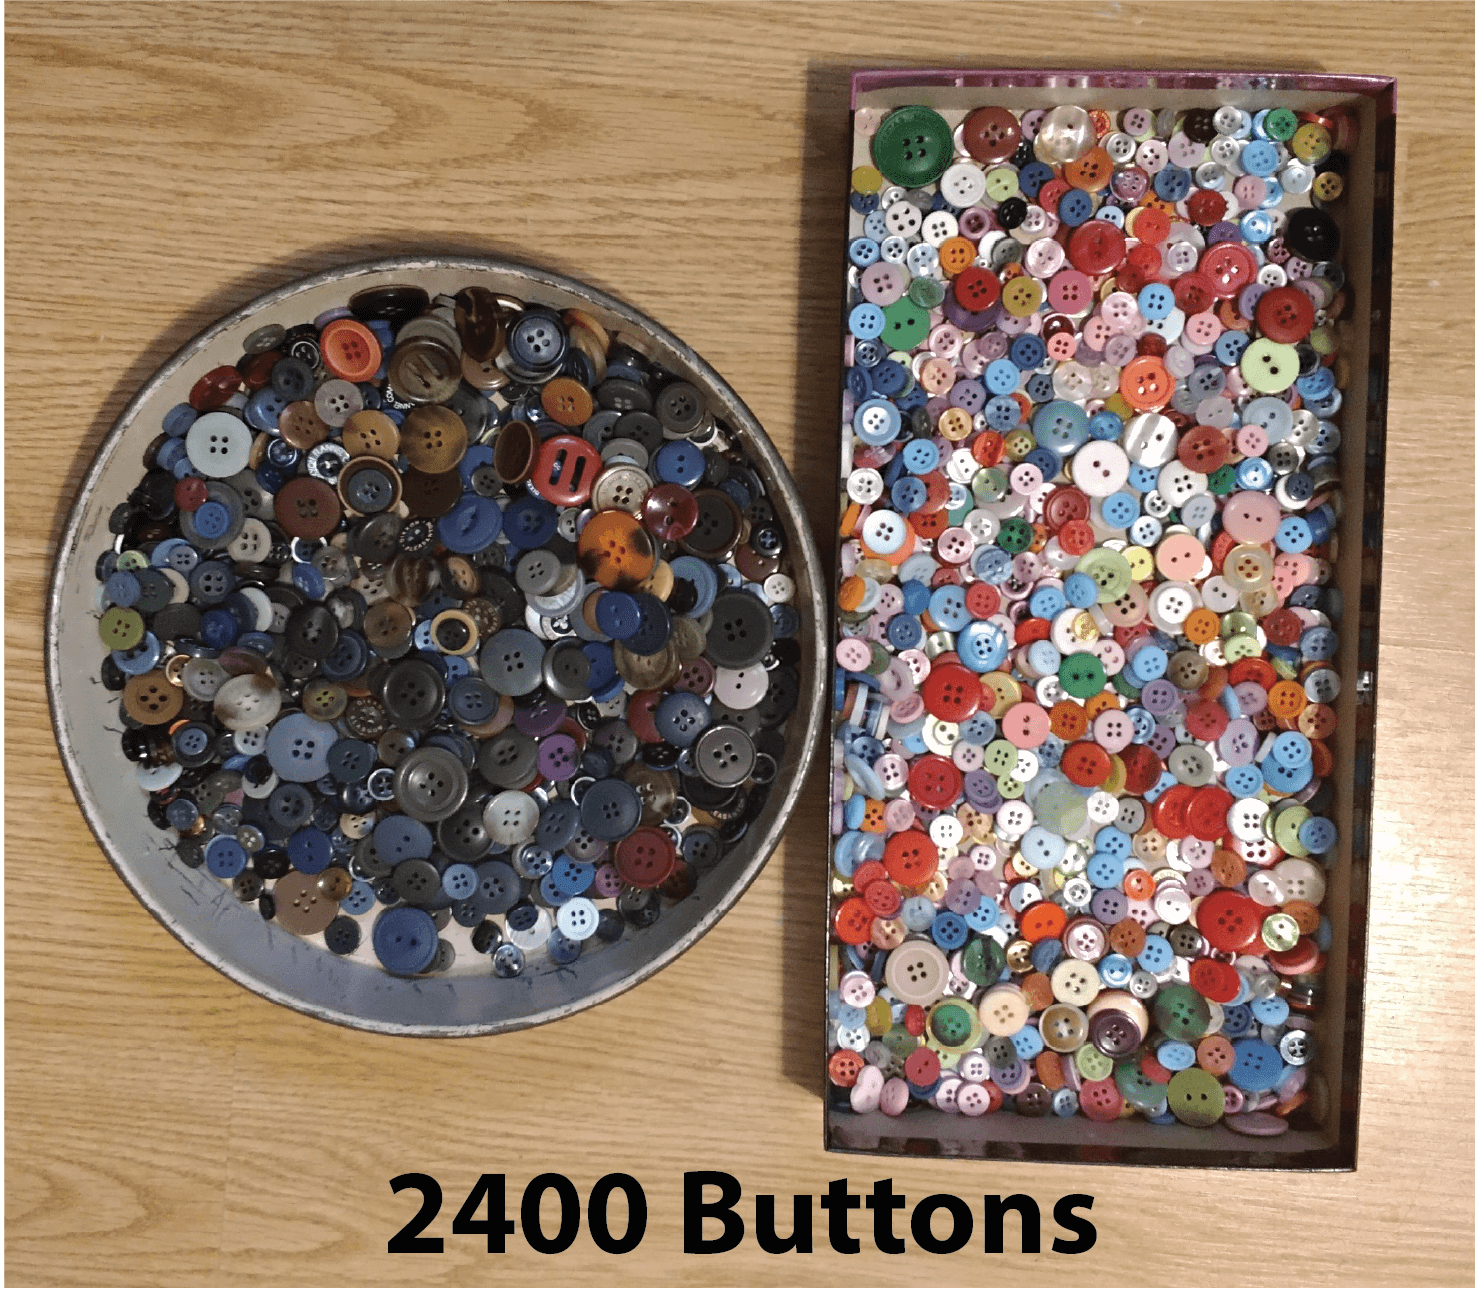
Since our local stores didn't have button assortments, I ordered a 2400 button pack online. One would expect to be able to make a few button dolls out of that. I was disappointed, however, in the somber bunch of buttons that arrived.But when I sorted the cheerful, kid-friendly, circus-suggesting buttons from the darker "men's suit" buttons, it made a world of difference. Now we have some yoyo-worthy buttons.
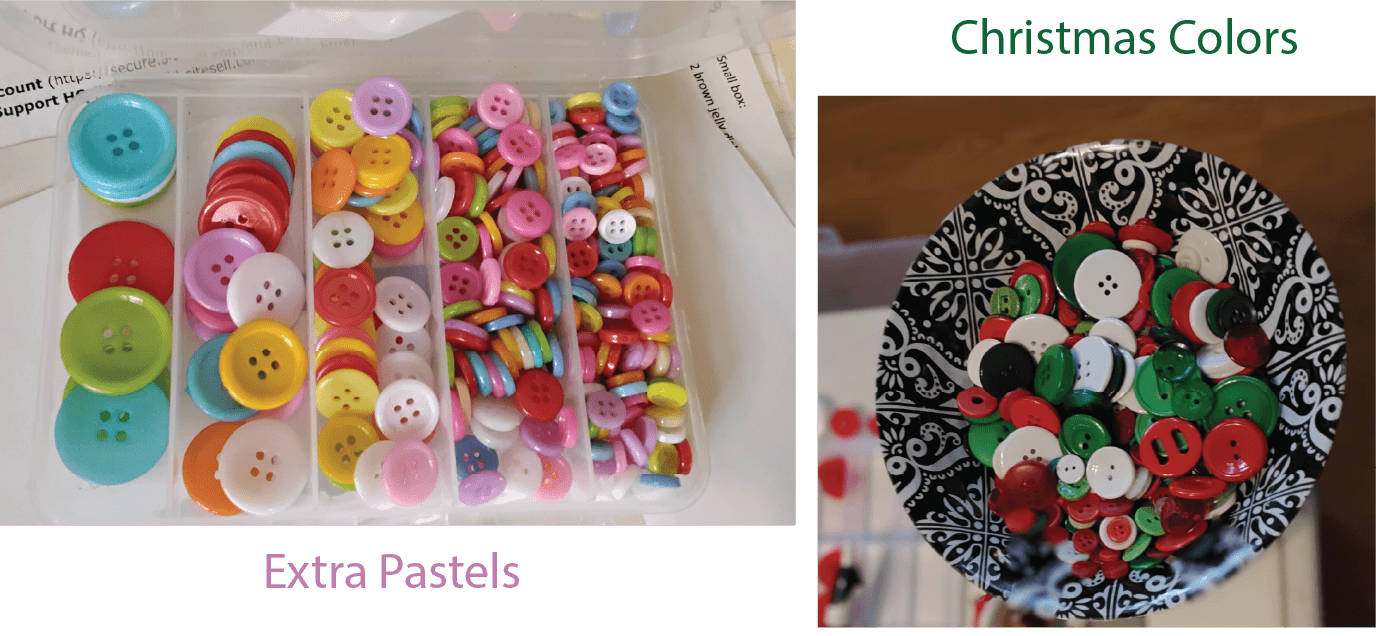
Since I wanted to make Christmas hats, I also ordered a container of red buttons (not pictured.) This gave a consistent thickness and red color to the hat.
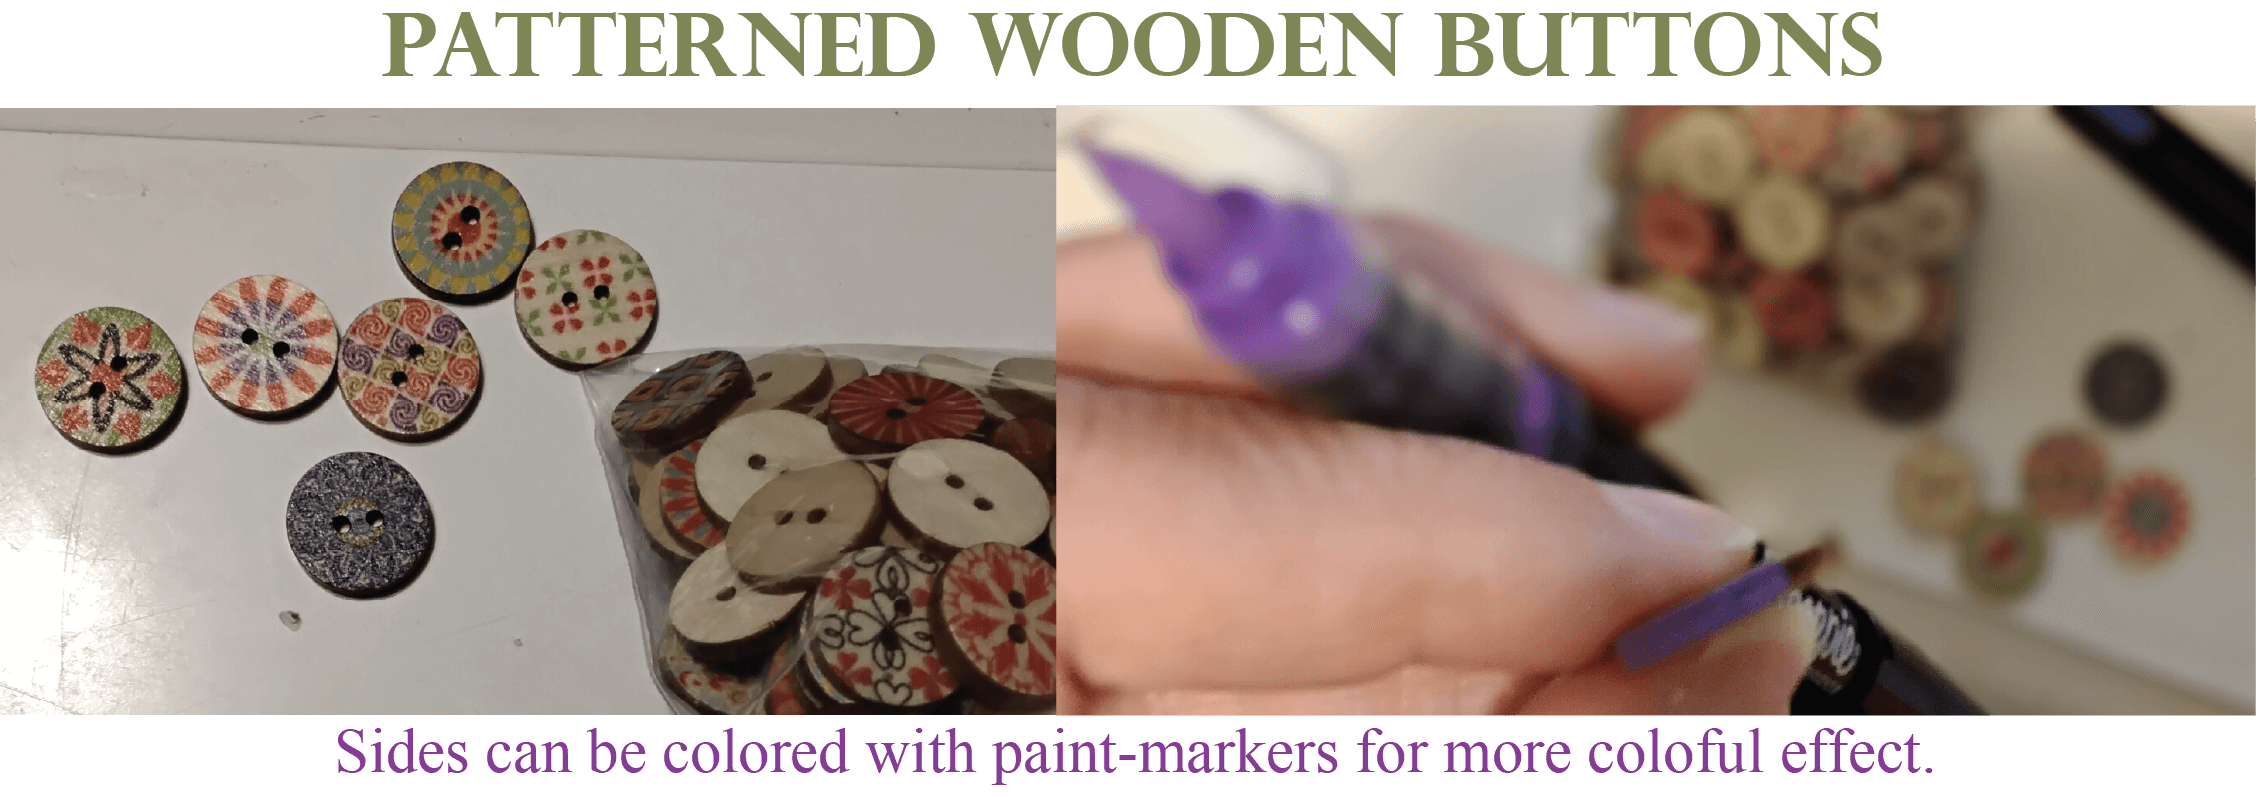
Patterned Wood Buttons
Beads
THE ESSENTIAL SUPPLY LIST
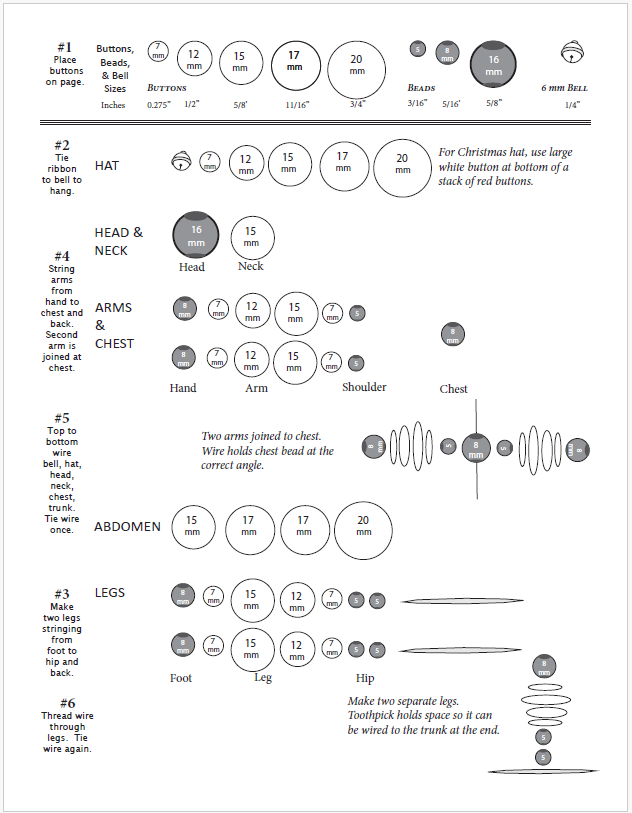
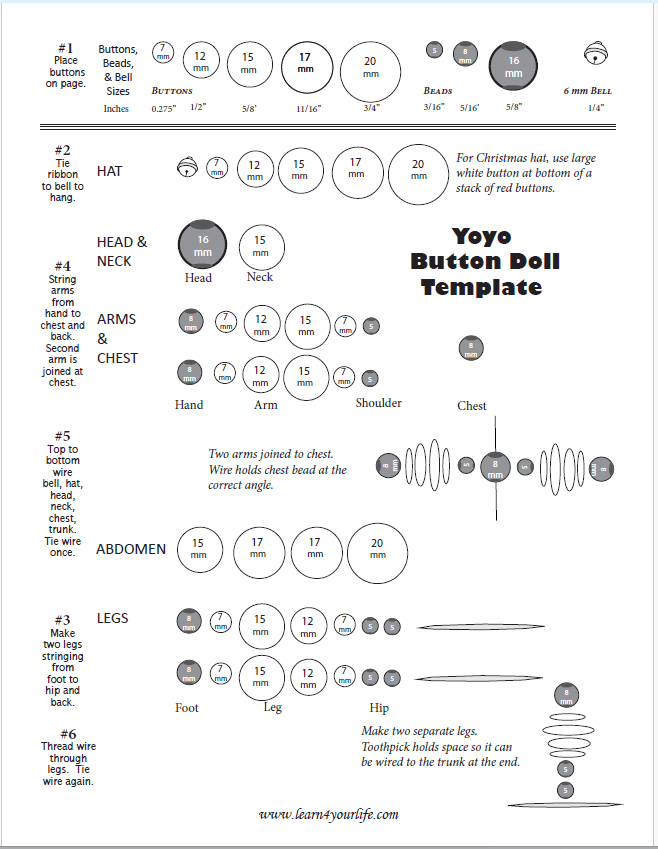
- 20 buttons (size 5 to 20 mm) - 4 each for trunk and each arm and leg
- Optional: 4-5 red different size buttons for Christmas hat with one white button (lots of variations for others hats)
- One Jingle Bell for hat (used tiny 6 mm or 1/4 inch)
- One neck/collar bead (Scalloped or two colored beads work great for the collar.)
- One 16 mm or 24mm bead for head (I used 24 mm copper color bead for an ethnically neutral skin tone)
- Five 8 mm beads (one for the chest, and two each for hands and feet)
- Six 5 mm beads (one for each shoulder and two for each hip)
- 16" 24 gauge wire for trunk (or other material)
- Four 12" fishing line for the arms and legs (or other material)
- Gold or other thread for hanging
- Optional: Candy cane or other object
- Lots of variations described in template.
Other Supplies and Tools
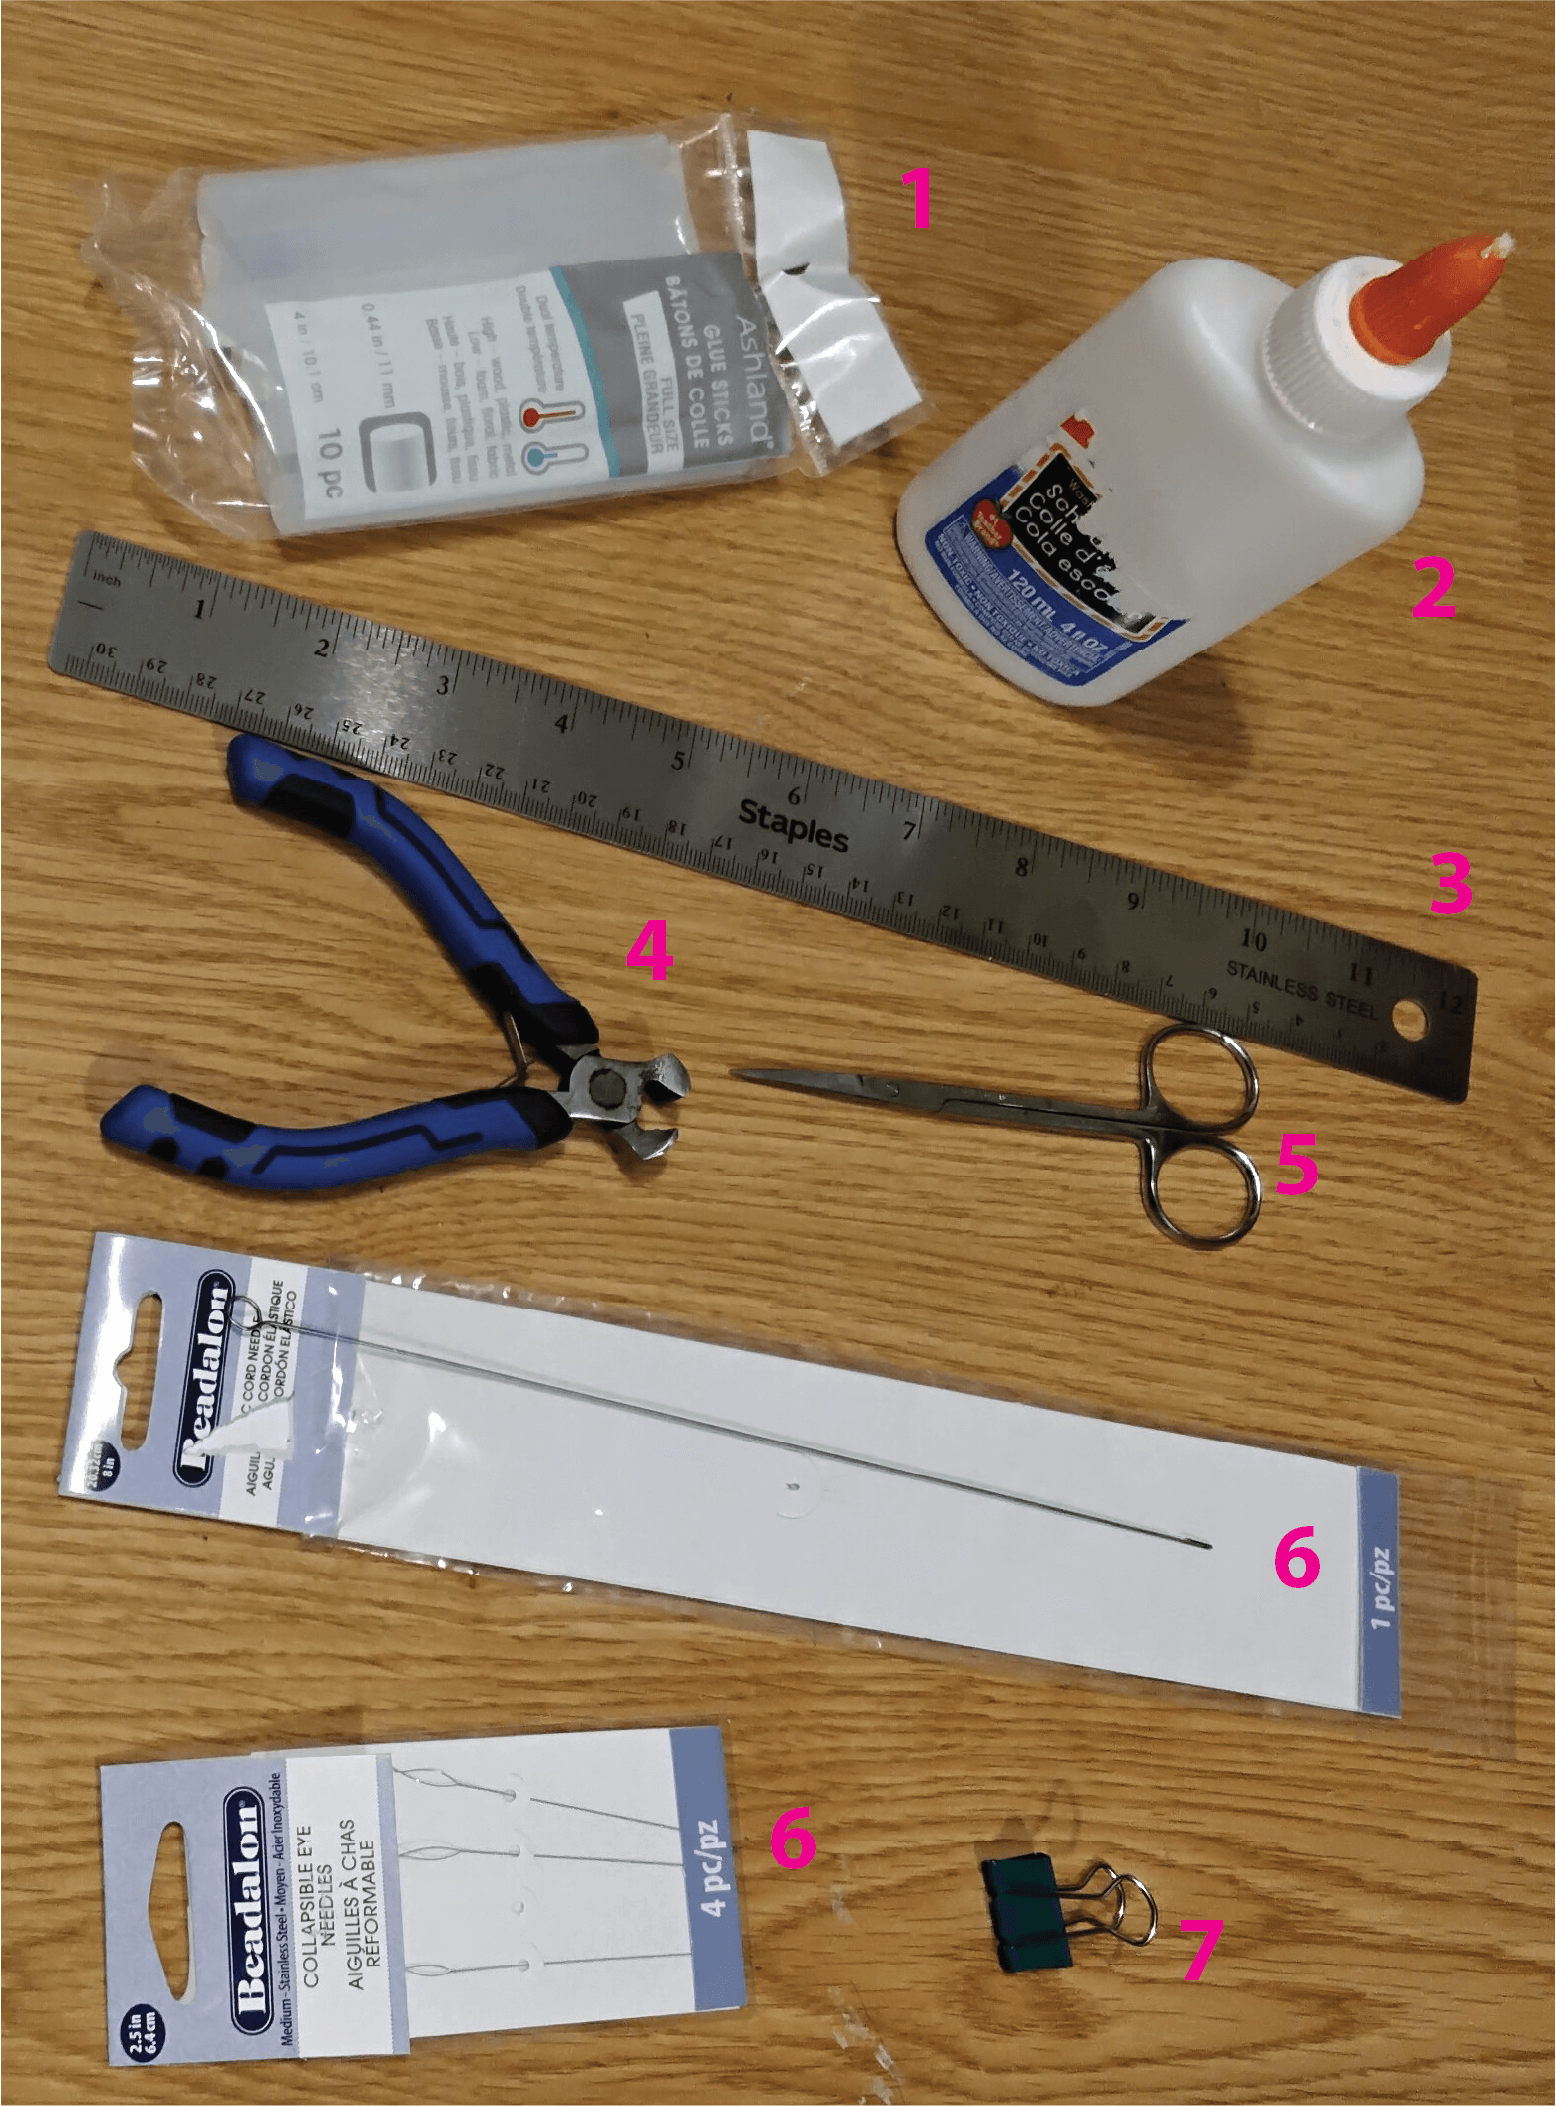
- Glue sticks and glue gun (to glue the candy cane to her hand)
- White glue (make knots with fishing wire permanent
- Ruler
- Wire cutters
- Small snipping scissors
- Optional: Beadalon (brand name) Cord Beader (Long needle like object that can be used to thread buttons or beads.) I used it to stabalize the chest bead.)
- Optional: Beadalon beading needles (very thin flexible needles can bend around beads.) Wears out fairly quickly
- Optional Clip - Prevent beads from going out the other end of your wire.
- Optional Mug - Used as mini-trash can for all the little snippets and bits.
- Sharpies - Face, Wire, Add color to buttons
- Washcloth - Prevents your beads from bouncing and rolling
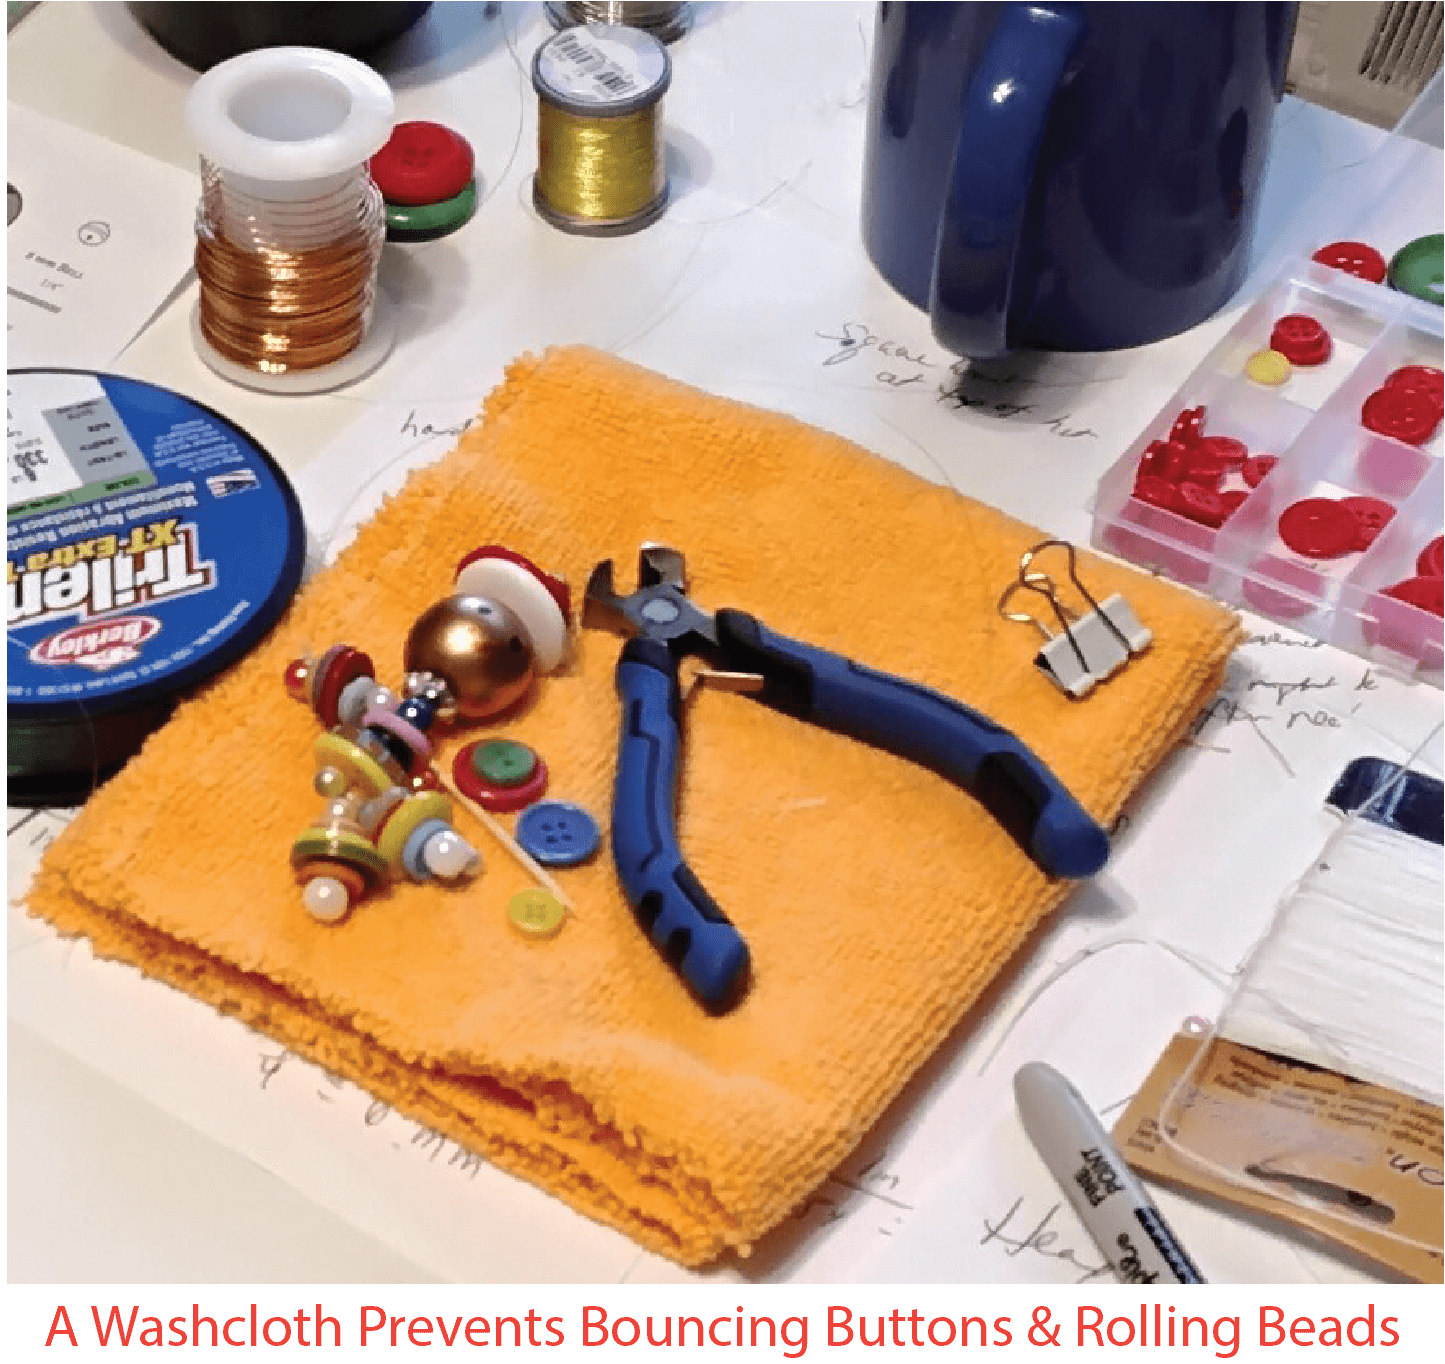
A Doll-Making Station
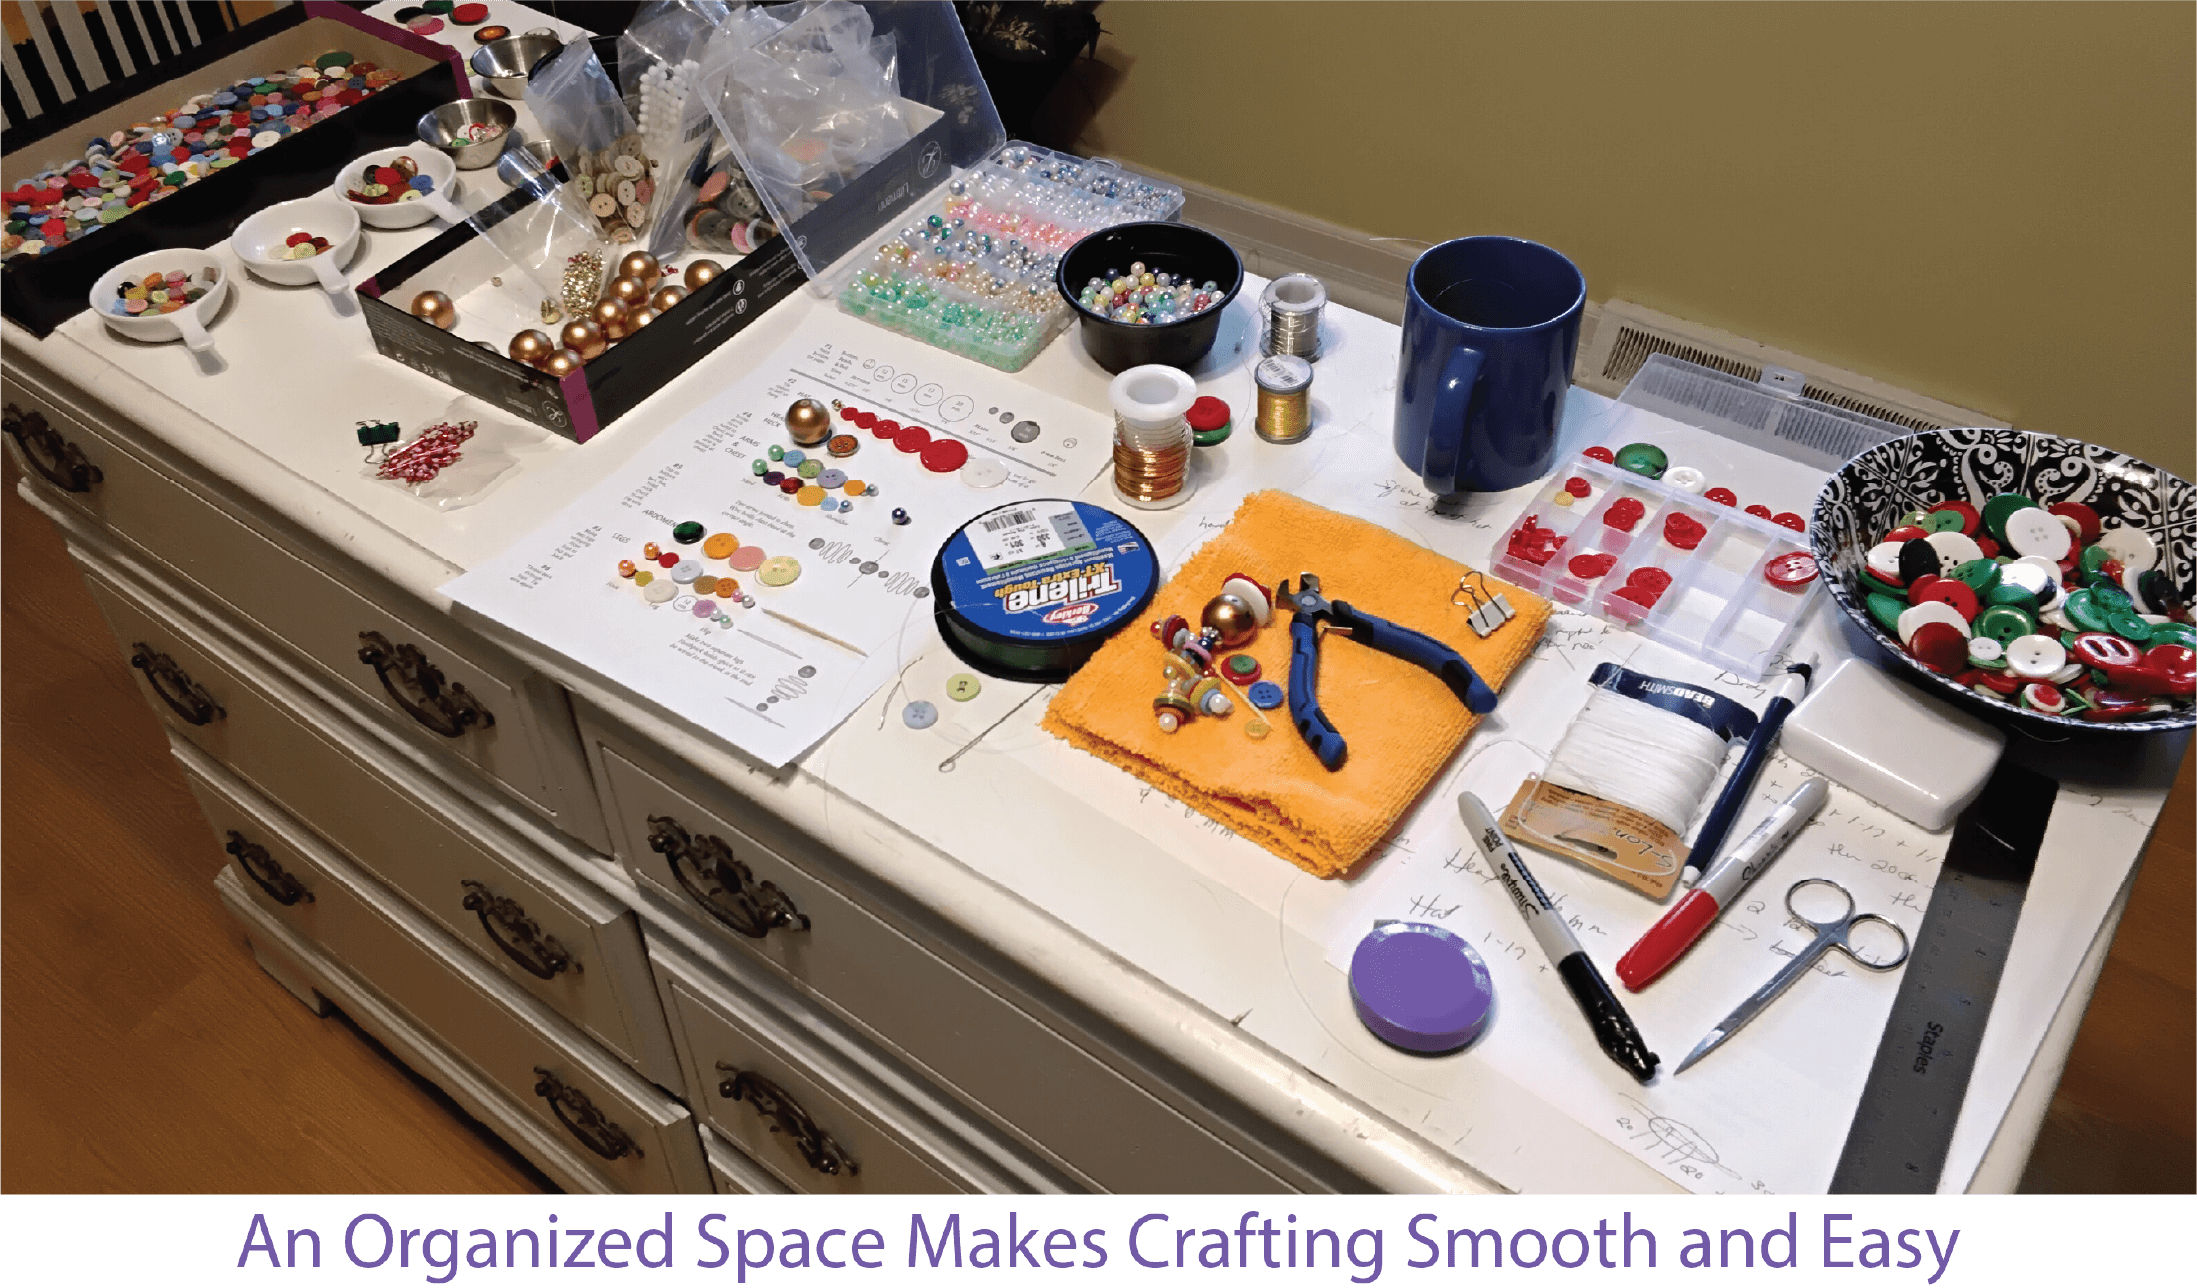
Spread things out left to right in the order you will use them.
Ready? Let's Make the 1st Yoyo Button Doll!
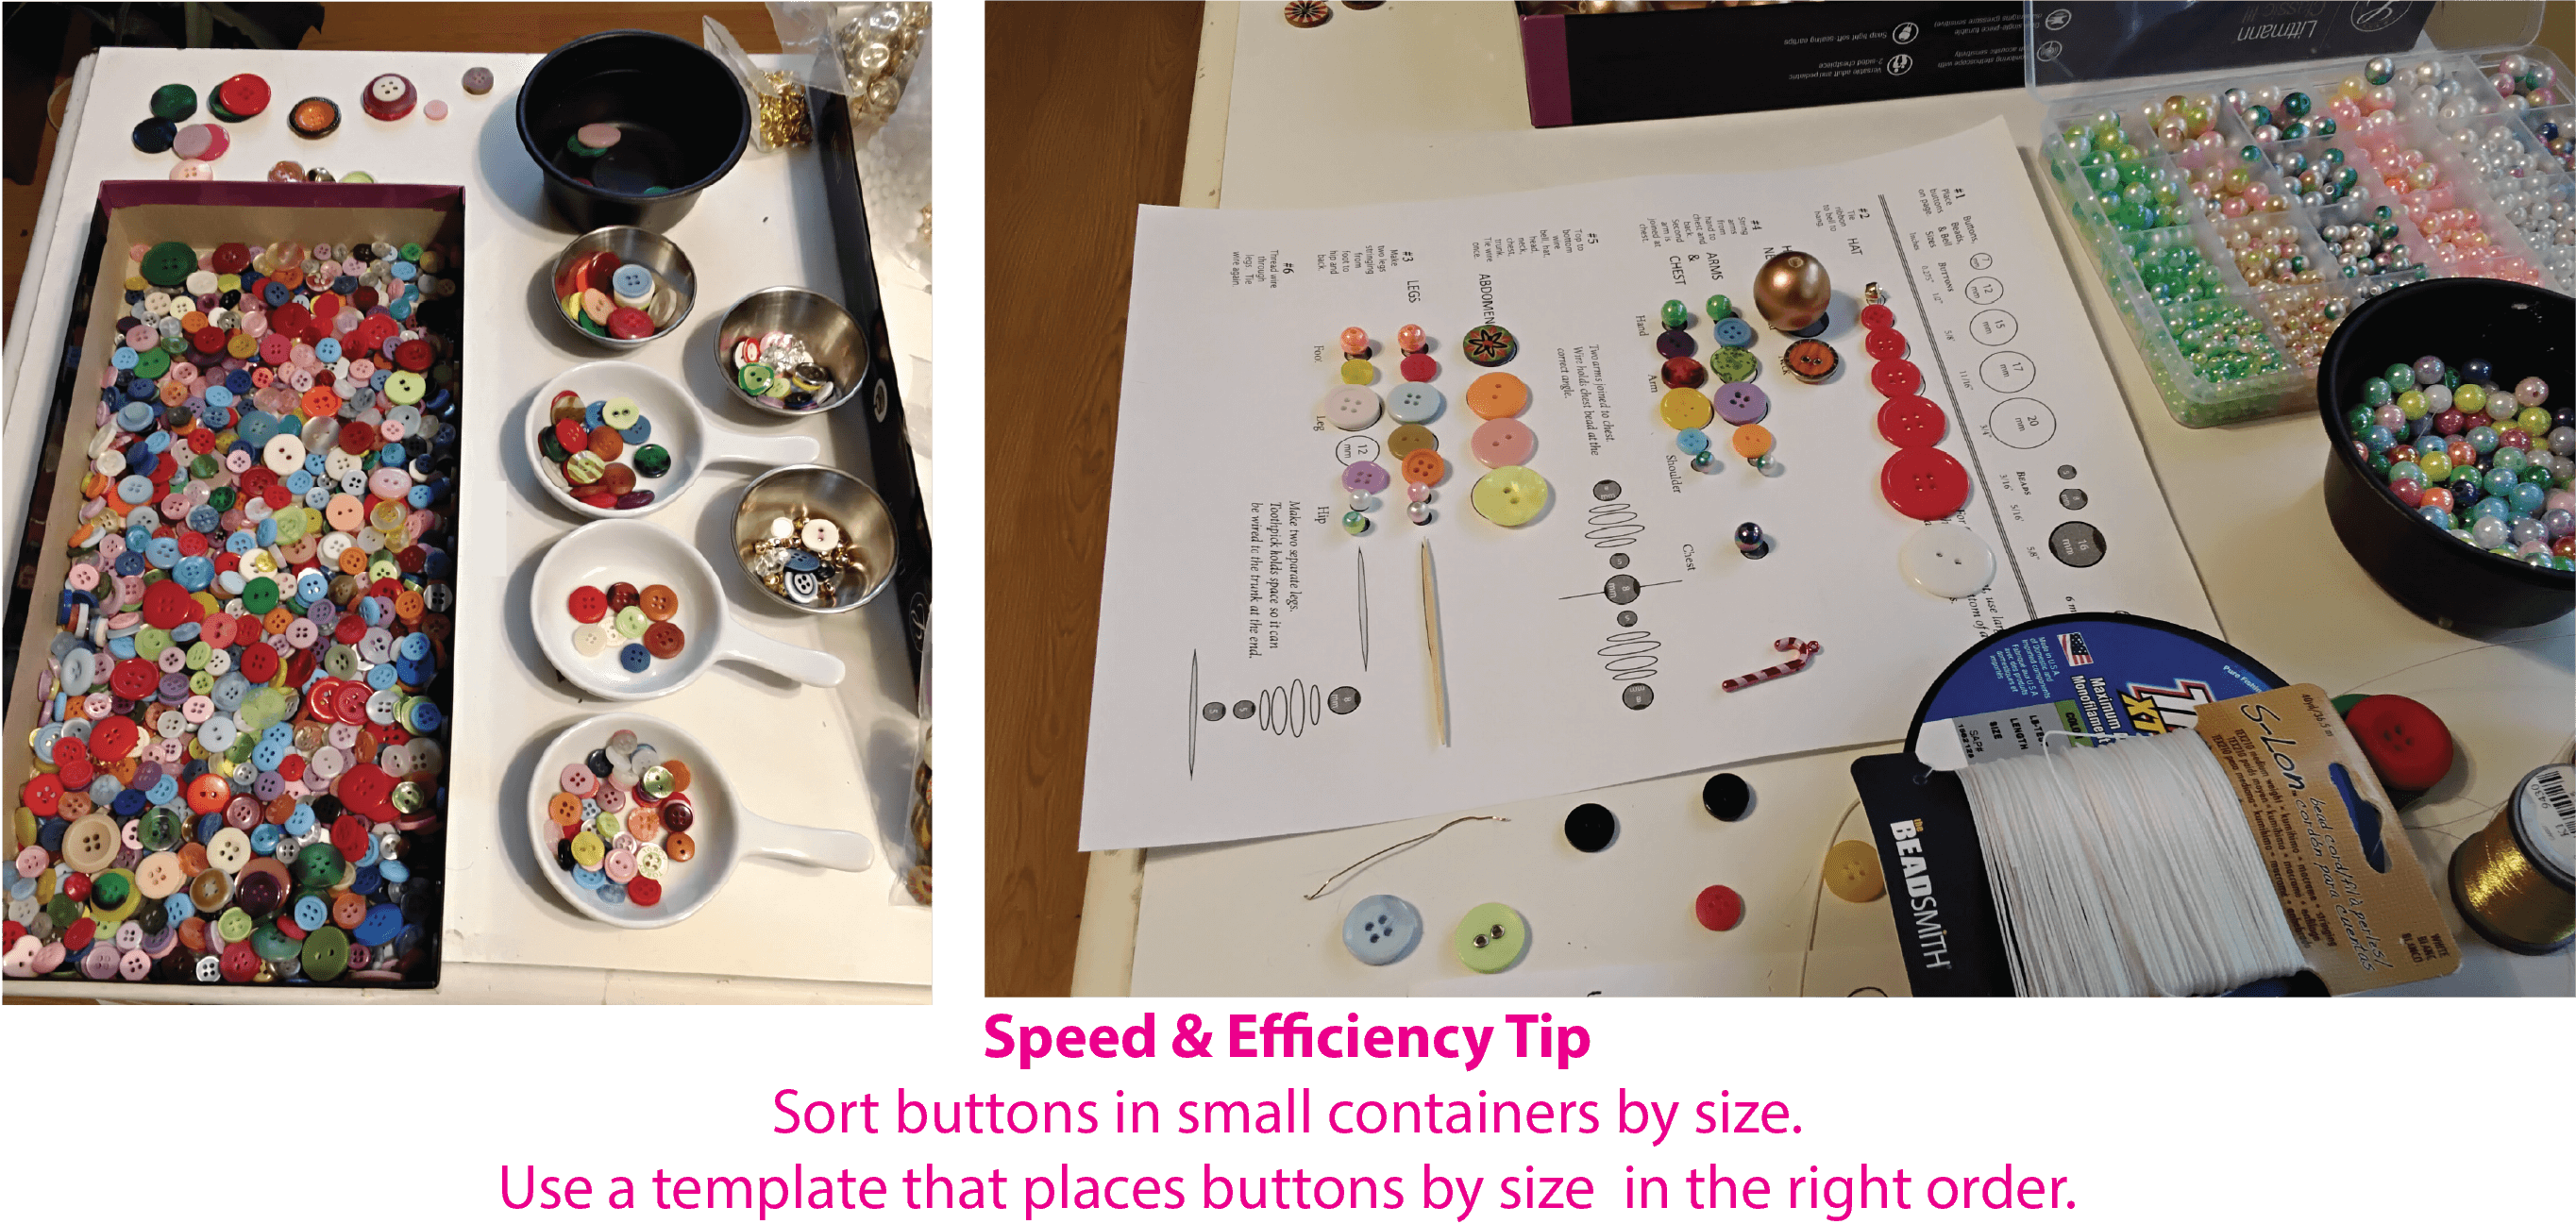
Step One: Pick Your Buttons and Beads
And Line Them Up
Why not pick out the buttons as you string them? It's easier to balance pastels and primaries and change things around if you find you used too much of one color. Believe me, you don't want to go back and unstring a section to balance the light and dark colors.Step Two: Tie Hanging Thread to Top Jingle Bell
You need to attach the thread to the jingle bell or whatever button or bead will be at the top. The tendency is to wait until the end to hang the string - but then it's much harder.Amd, by the way, you really should learn how to make the round Square-Knot if you don't know how.
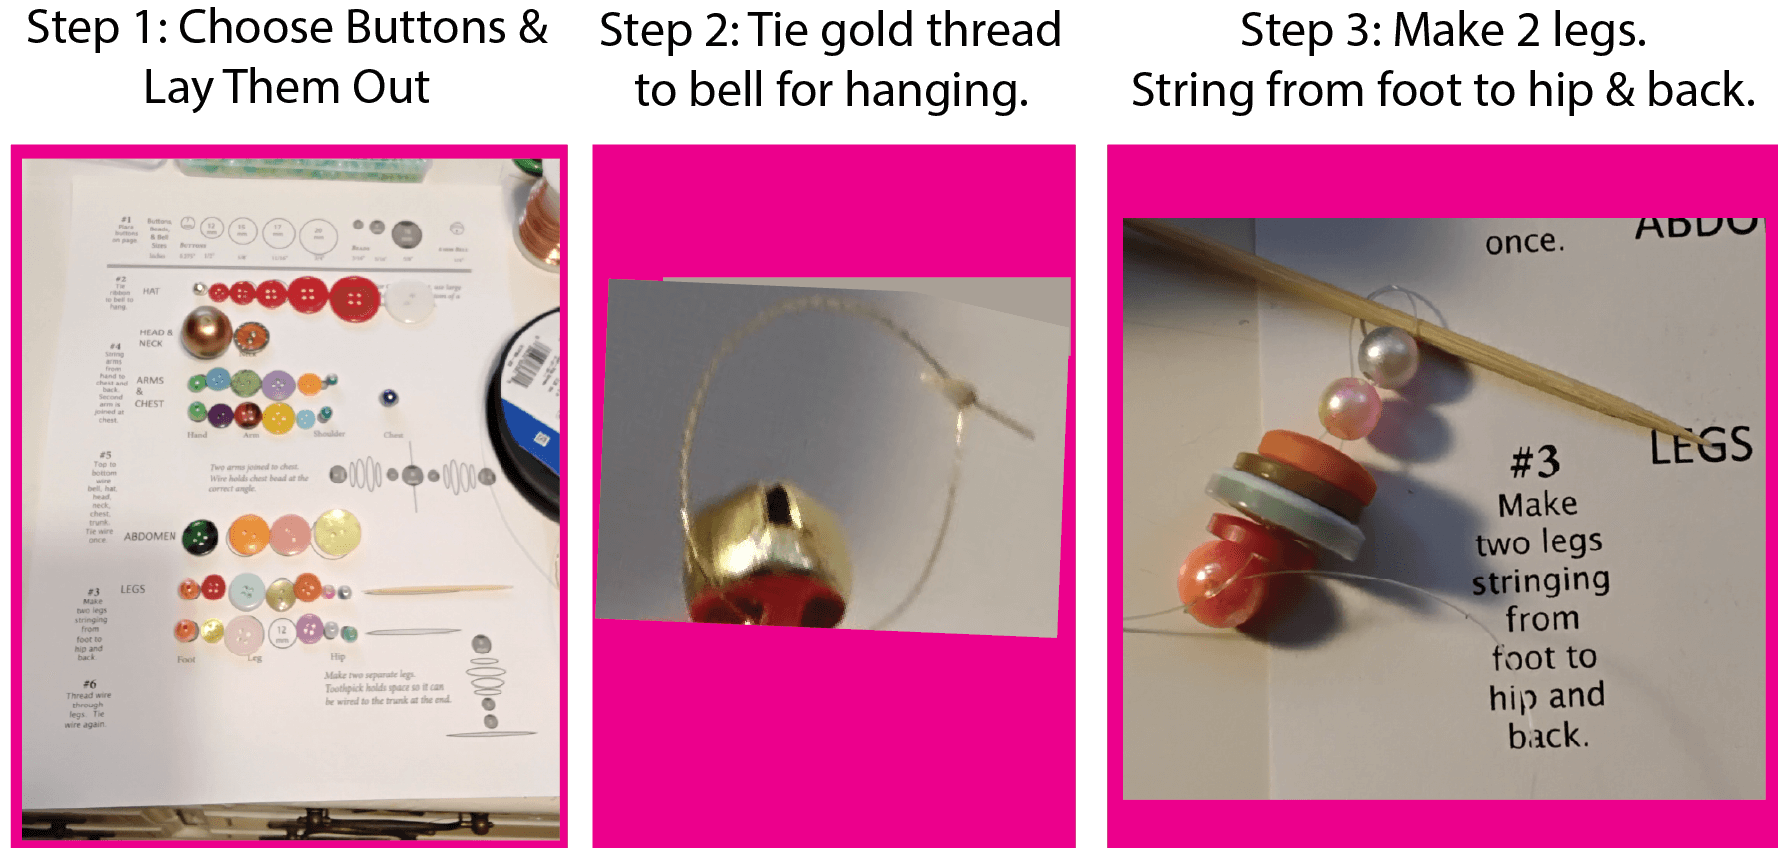
Step Three: Two Legs
The Toothpick Helps
In this model, the legs and arms are made first, and then added to the body later. There are a couple of things to note before you tie off those limbs. In order to have enough space in your fishing line (or other material), place a toothpick between the final two hip beads before making your square knot at the hands. This will save a space. Don't worry, when you tighten that knot the toothpick will slip to the very end which will give you the space to slip the wire of the main body through near the end.
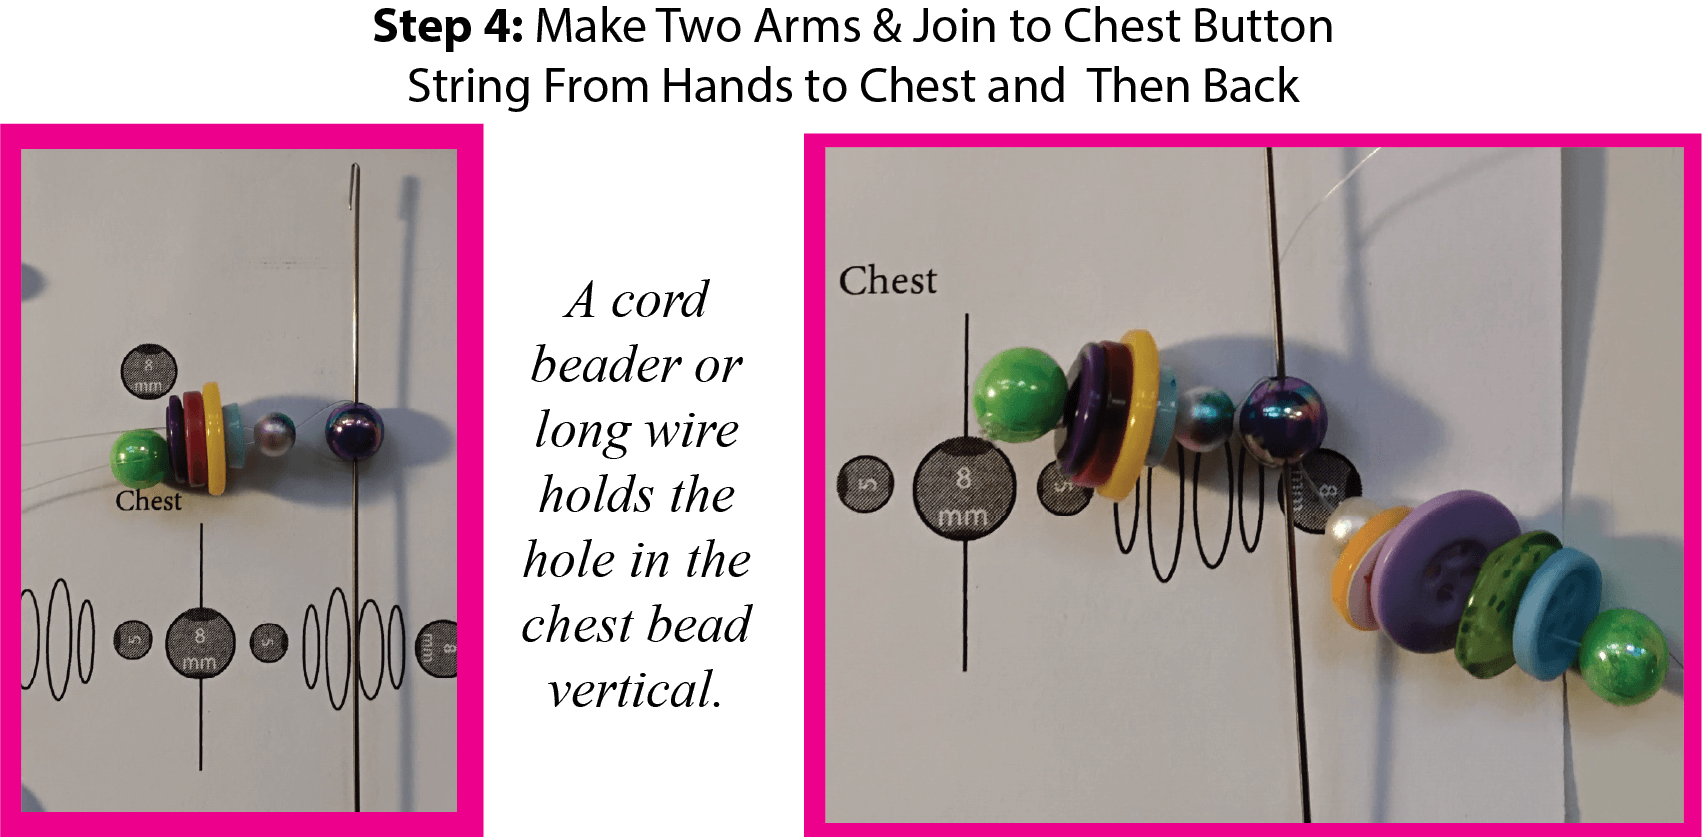
Step Four: Two Arms Joined Through Chest Bead
A Wire Keeps the Chest Bead Aligned
While making the arms, you need to remember that the hole in the chest bead is going to run perpindicular to the holes in the arm beads and buttons. That's because the main wire that attaches head to abdomen will go down through the chest bead. Therefore, it helps to keep a long wire (or the Beadalon Cord Beader which I used) running through that chest bead. I inserted it right before I make the first round-square knot on the first arm.

Step Five: Assemble the Body
Top to Bottom
Once you get the arms and legs made, it goes super fast. Double the main wire, thread it through the jingle bell, the buttons of the hat from smallest to largest, the head, neck, chest bead, and abdomen buttons.Step Six: Add the Legs
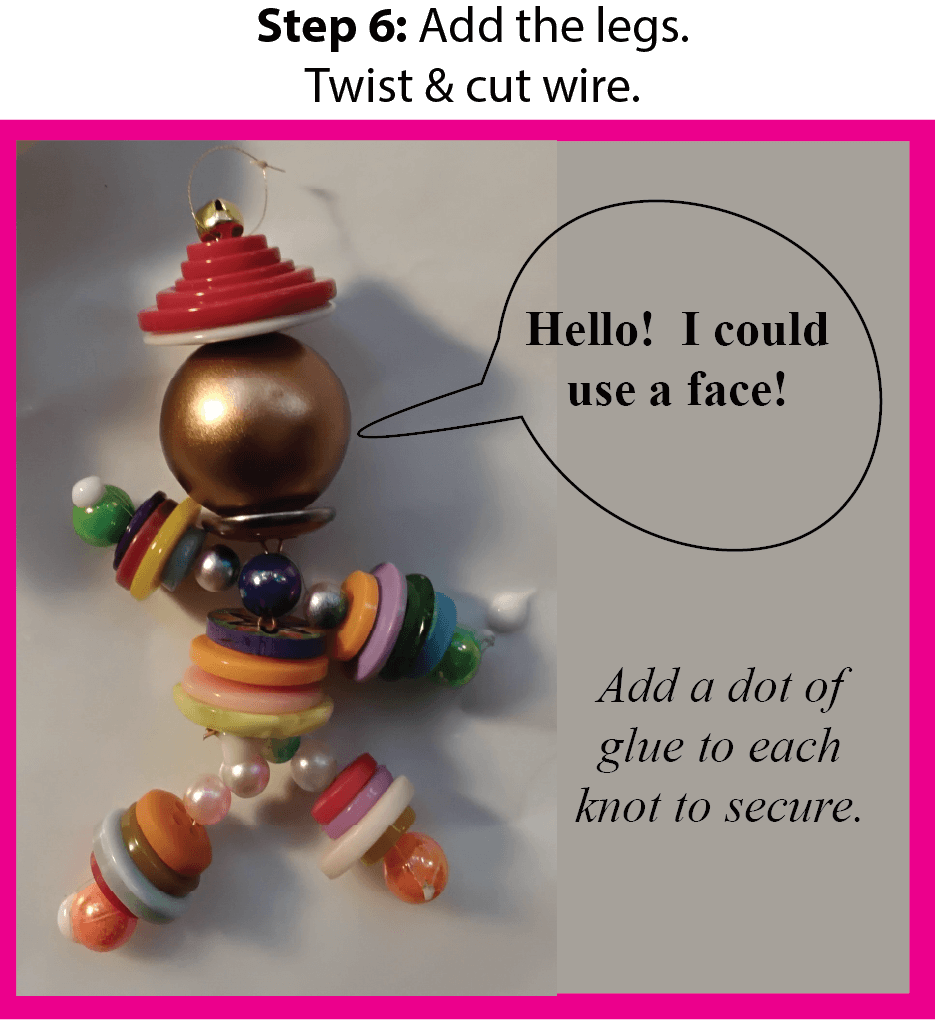
Before cutting the main wires, add the legs. You will appreciate the extra step you took in inserting that toothpick in the earlier phase.
Each end of the wire goes through one leg. Tie the two legs together, clip the wires with the wire cutters, and push them into the bottom button.
Finally, it's time to add your finishing touches.
Step Seven: Finishing Touches
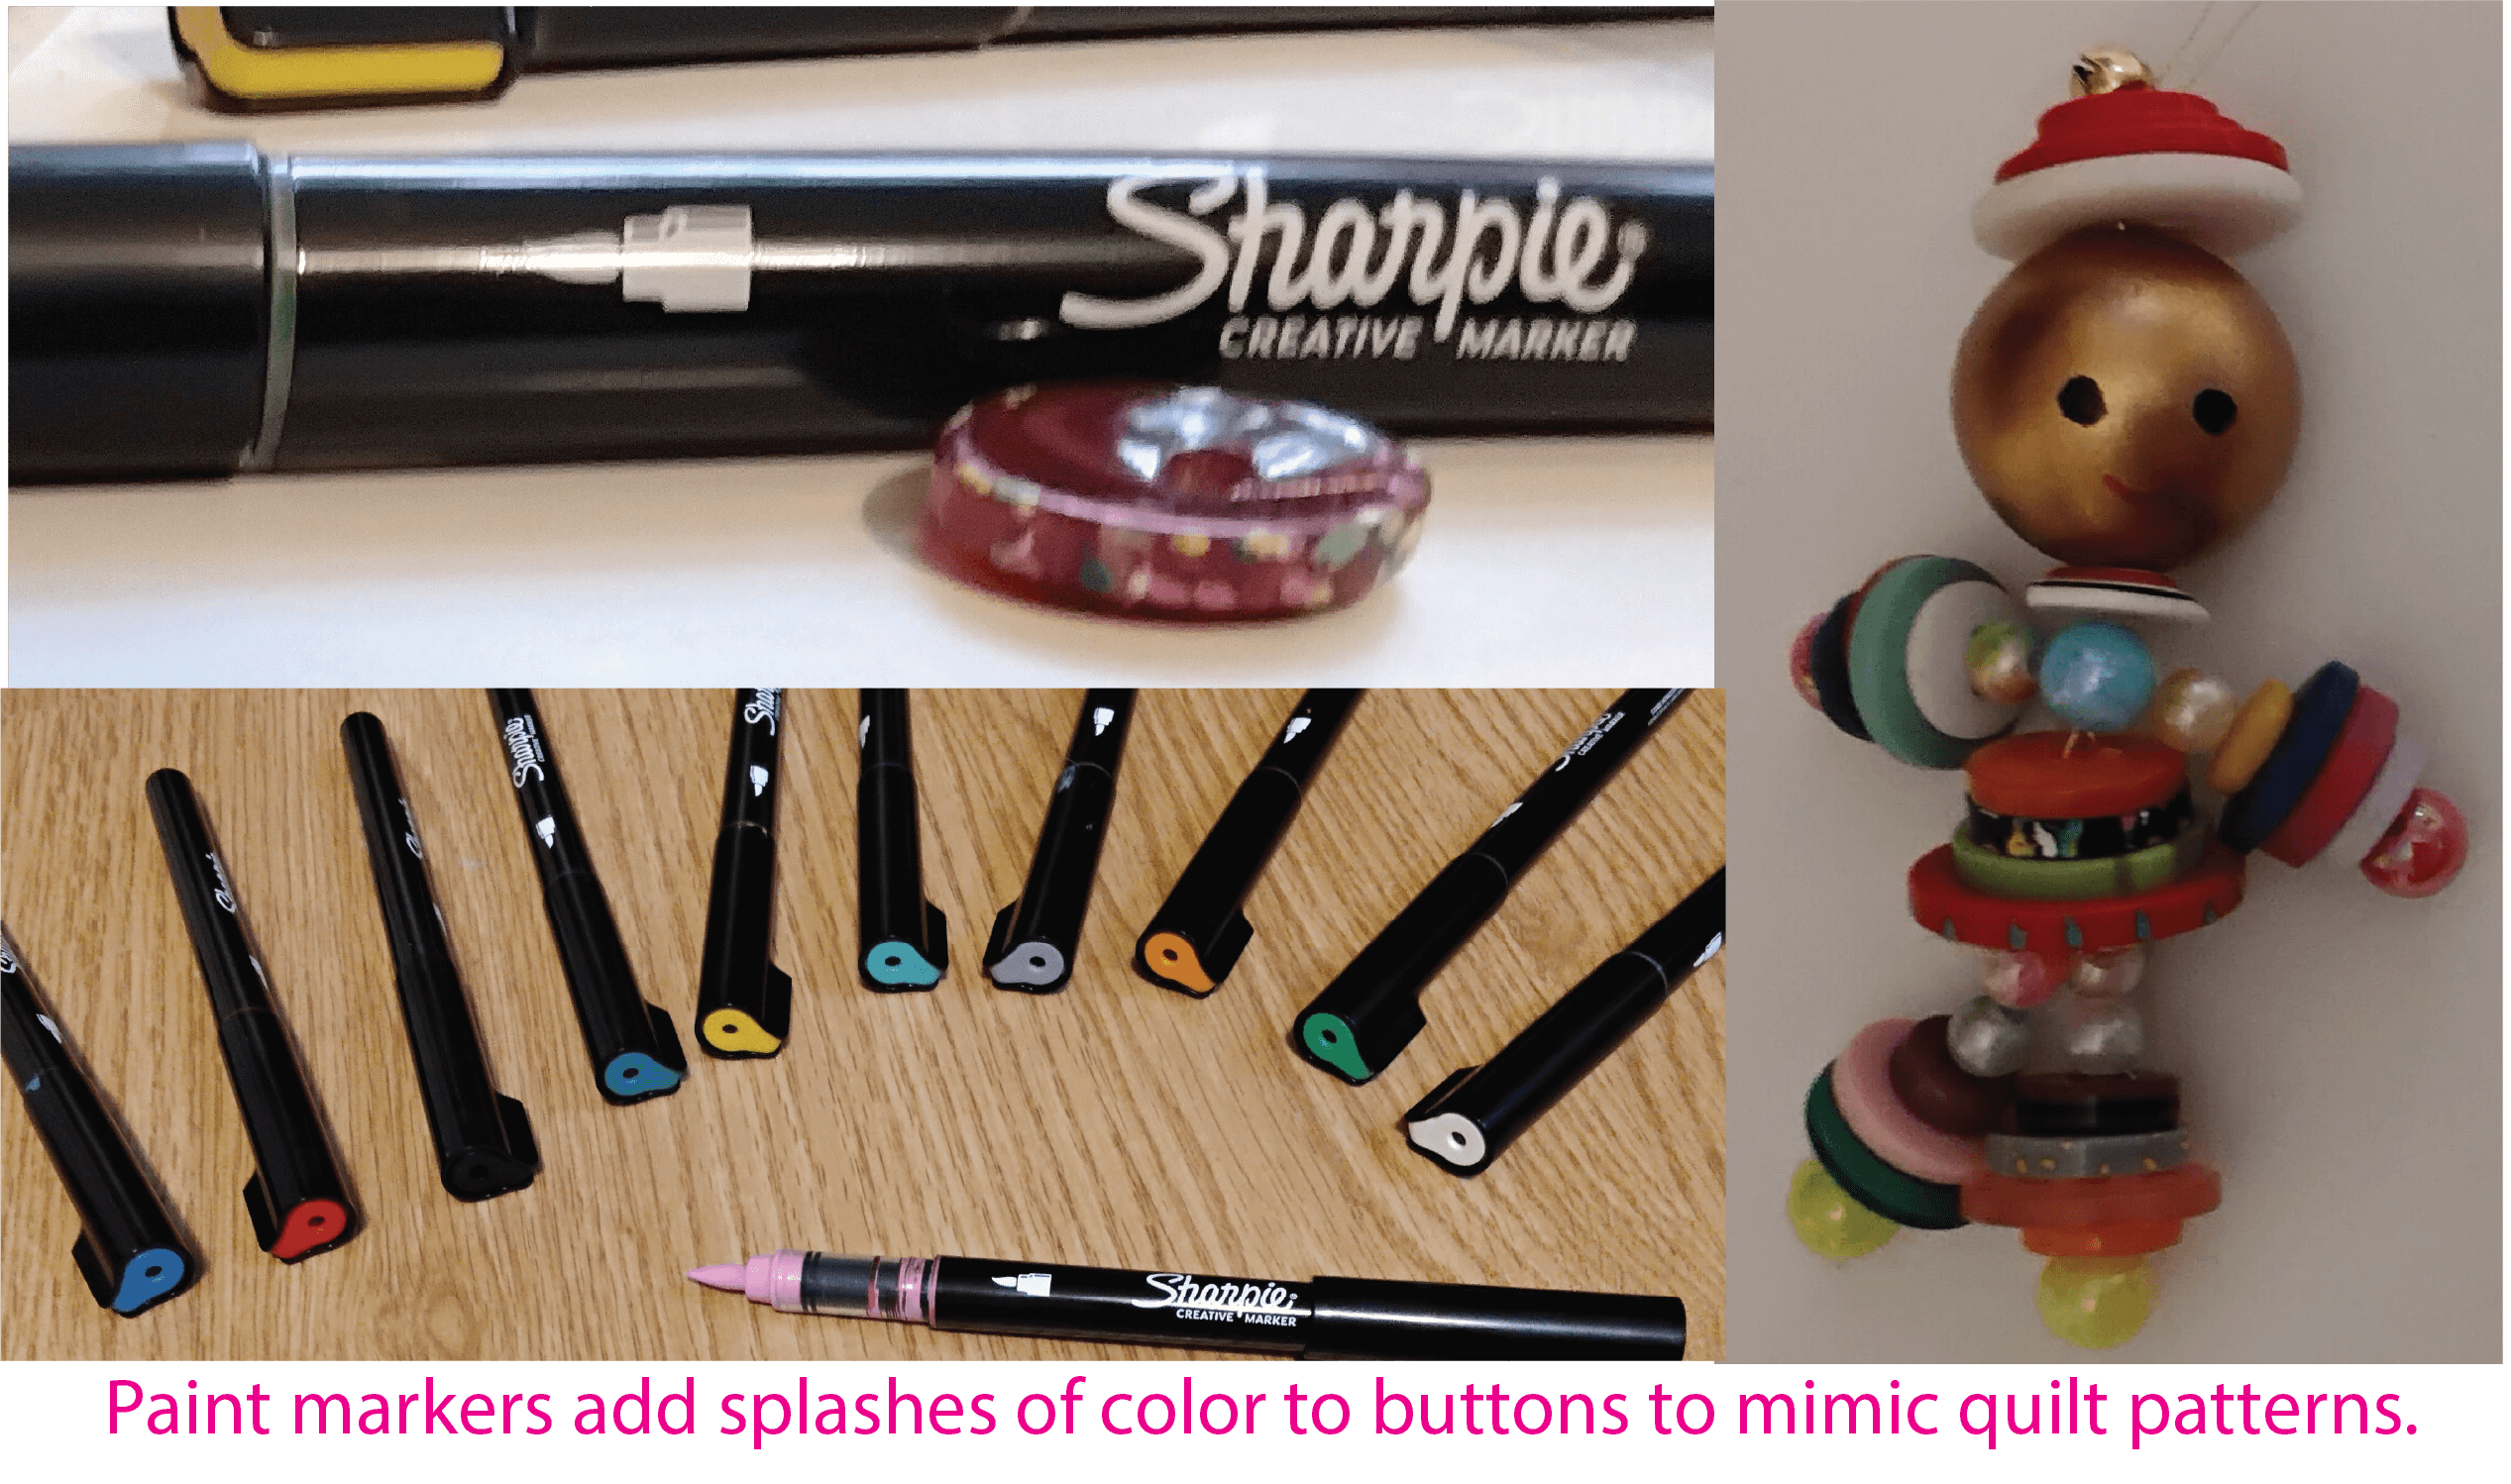
You can add the face, add an object for the doll to hold (I used candy canes at Christmas), and add pattern to buttons.
Using the Template
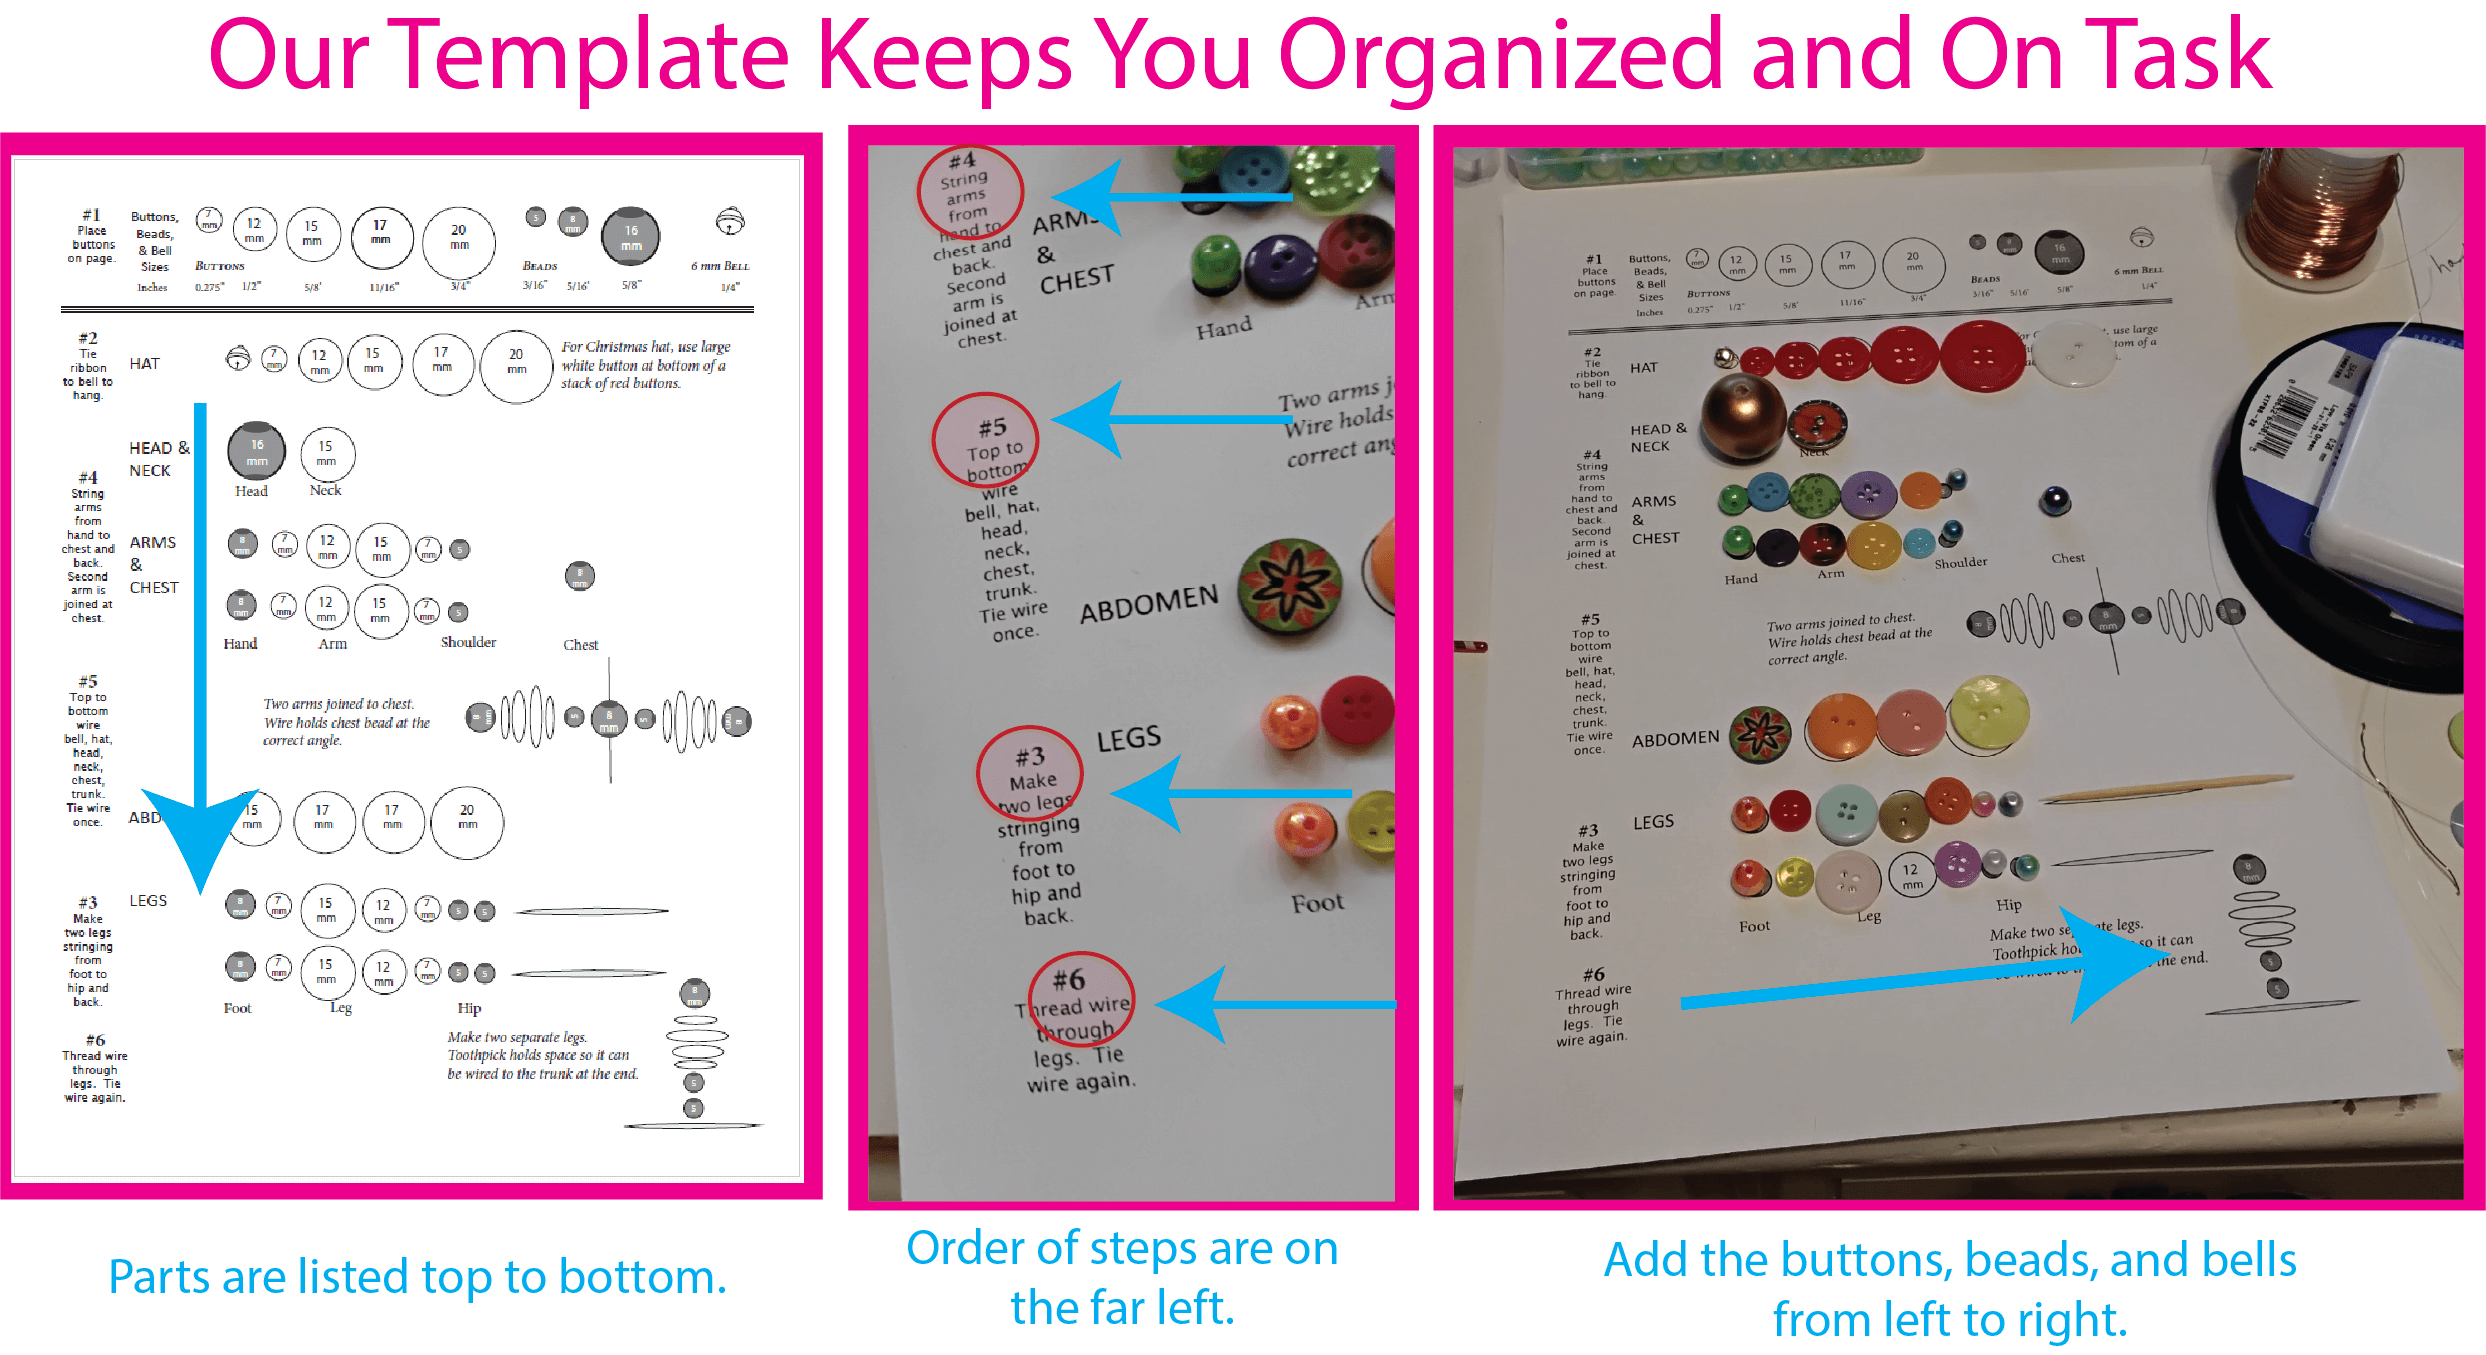
The template, however, keeps you on task. A phone call or question would throw me off, and then I would discover I had the shoulder and hands reversed.
With the template, you decide your button/bead combinations before you start stringing them. It makes it easier to switch color combinations and also makes the stringing process go faster.
Print the Yoyo Button Doll Template & Directions
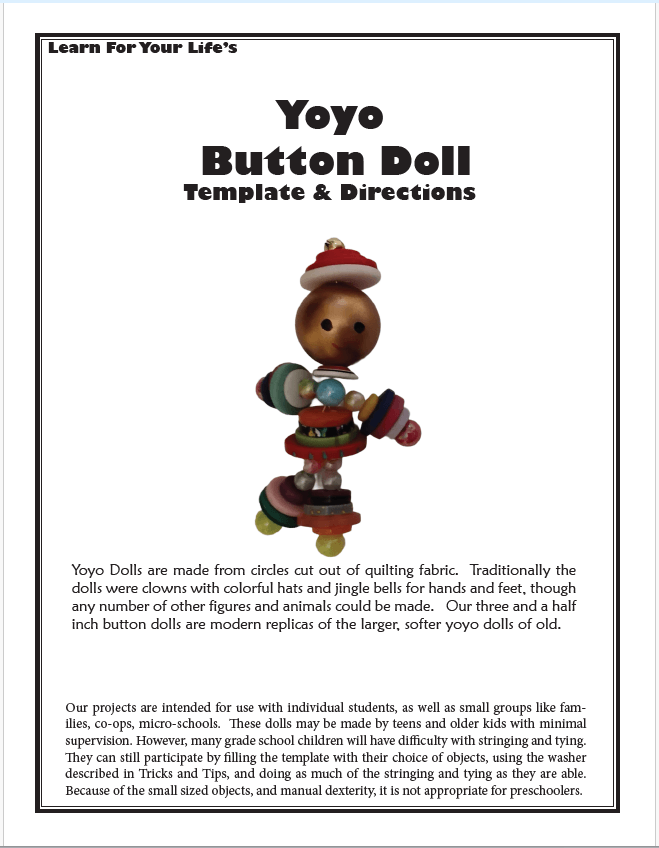
7 Page Template and Step-By-Step Directions
Includes alternatives, modifications, and Tips & Tricks
$2.99 Download
![]()
Making Yoyo Button Dolls with Kids
These dolls may be made by teens and older kids with minimal supervision. However, many grade school children will have difficulty with stringing and tying.
They can still participate by filling the template with their choice of objects, using the washer described in Tricks and Tips, and doing as much of the stringing and tying as they are able.
Because of the small sized objects, and manual dexterity, it is not appropriate for preschoolers.
More Christmas Pages For Your Holiday
Christmas Tree Ornaments
Christmas ornaments for crafty families
Zentangle Ornaments
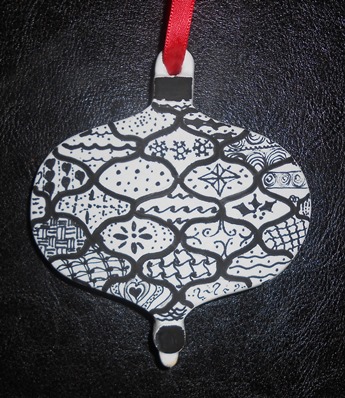
Zentangle Christmas Ornaments
Quilling Stars
A Paper Craft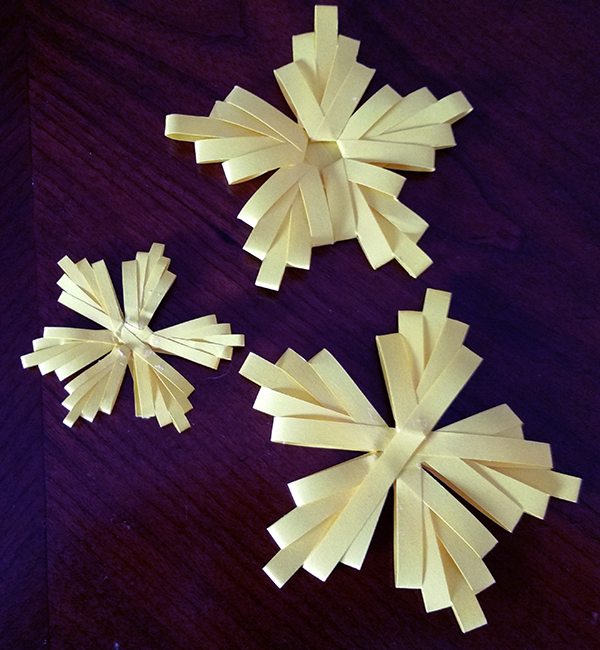
A Paper Craft
Directions for 5 different quilled stars
Yoyo Button Dolls
Directions & Template
Christmas Day Activities
Plan how to keep Christ in Christmas
Twelve Days of Christmas
Activities to celebrate Dec 12 to Jan 6
Raggedy Ann
and Andy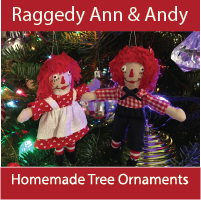
and Andy
Home-sewn 4.5 inch tree decorations
A Christmas Carol
Unit Study of Dicken's great classic
Watercolor
Nativity Scene
Nativity Scene
Instructions for beginner ornaments
Ready To Use Resources


About Our Site
Hands-On Learning

Our Site At A Glance
By Karen Newell Copyright© 2009 - 2026 Learn For Your Life All Rights Reserved