Simple Machines
The 6 Simple Machines MatchCard gives students practice identifying the basic machines and their function.
Free Download Below
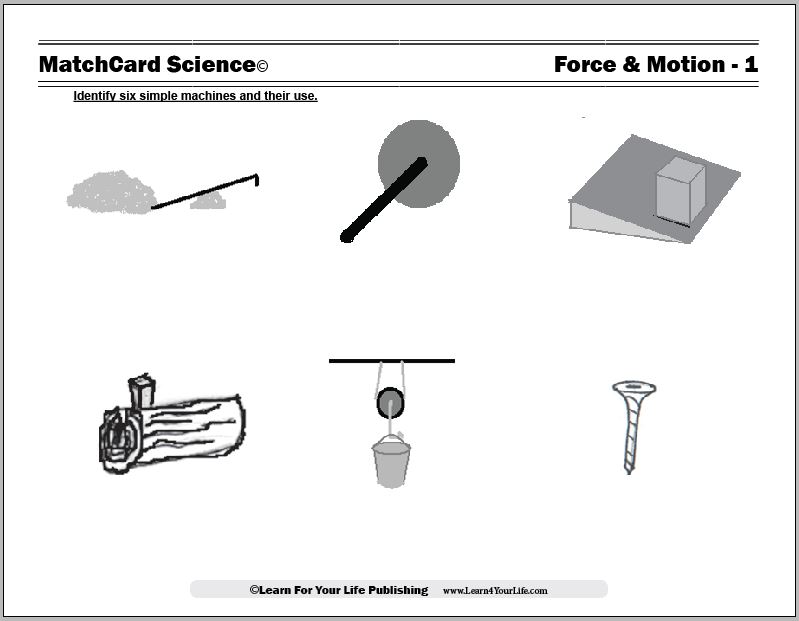

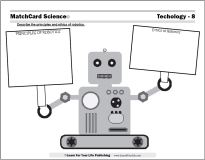
The Six Machines MatchCard
Objective: Identify the six simple machines and their uses.MatchCard: Download below.
Provides a diagram and information pieces for the following: lever, wheel & axel, inclined plane, wedge, pulley, screw.
Projects: Use the six simple machines.
Download the 6 Simple Machines MatchCard

This is MatchCard #1 of the Force and Motion Unit Study. You can find more information on MatchCard Science below.
Getting Ready to Teach the Simple Machines
Scavenger Hunt
Gather the items below (or pictures of them) prior to starting the unit. This can be a scavenger hunt. A separate list is provided in the unit study.Don’t tell them what these items are for (studying simple machines.) A laundry basket or similar size box would be useful to put the items in:
- Crowbar
- Hammer with claw
- Scissors
- Tweezers
- Straight screw driver (flat edge)
- Door knob
- Toy car
- Sink handle
- Pizza cutter
- Tape dispenser
- Ramp for toy car
- Picture of ramp for working on car
- Piece of marble run
- Knife
- Push pin
- Needle
- Picture of syringe and needle
- Axe
- Picture of Curtains
- Picture of window shades
- Fishing pole
- Shoe lace
- Key ring
- Light bulb
- Jar lid
- Screw
Kits and Supplies
There is a note about different kits and materials you might wish to invest in when teaching the six simple machines. You will still want to use some of the materials above.Planning 3 Part Lesson
We recommend introducing the 6 machines on three separate days, two machines per day. The introduction (above) can be included on Day 1 or the day before.Introducing the Simple Machines
The unit study includes:- Brainstorming on the purpose of the items in the scavenger hunt
- A scenario of tools wanted on a deserted island
- Discussion about the advance of civilization and the 6 simple machines
Activities with Simple Machines
Lever
When force is applied at one point on a lever, the bar rotates around a fulcrum to lift an object.Try this: Have a can of paint with the lid firmly sealed on hand. There should be a utensil like a flat screw driver or spoon nearby which can be used as a lever. Ask them to get the lid off.
The use of a lever requires three things: Work (effort), load (item to be moved), (fulcrum) point around which the force is applied.
Look at the picture on the MatchCard. A lever is used to lift a big rock. A small rock is used as the fulcrum. When you opened the can, the edge of the can was the fulcrum.
3 Classes of Levers
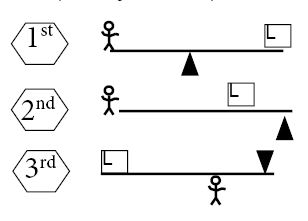
%3F. "Pin It")
Older students can be assigned to make an infographic or separate MatchCard of the three types of levers. It helps to remember the location of the load in relation to you, the worker or effort, as you proceed from 1st to 3rd class. Notice in the diagram that the load keeps getting closer to you than passes behind you.
Practice Using Levers
Here are the levers in your scavengered items:- Crow Bar
- Hammer with a Claw,
- Tweezers
- Scissors
Wedge
A wedge is pie-shaped edge can be driven into another object in order to separate it.The axe is the most commonly listed wedge. But let’s start with a simpler and more familiar wedge: a knife.
Try to slice a piece of bread or fruit with the thick edge of a knife (it can even be a plastic knife.) What is the value of the thin edge? Answer: acts as a wedge. Look at the edge of a large butcher knife and you may more readily see the sharp wedge. Careful of curious fingers!
More Wedges
Here are some more wedges:- axe
- push pins
- knife
- sewing needle
- syringe needle
Wheel & Axel
Everyone recongizes the value of wheels for moving things; but it may not be so obvious to youngsters that axels are needed for wheels to turn. Besides wheels and tires where else can you find axels? Look for:- Pizza cutters
- Door knobs
- Toilet paper rolls
- Tape dispenser
- Sink handles.
Lego Sets for Wheel & Axel
The easiest wheel and axel demonstration will be with any Lego or similar vehicle kit. If you don’t have one, use the instructions below.Make Your Own Wheel & Axel
You will need:- Small cardboard box (brownie mix or processed yellow cheese box or small cereal boxes will work fine.)
- 2 #2 pencils - full length
- 4 spools of thread the same size (can have thread or be empty)
- Turn the box on its side so the pencils can go through the box. The pencils will be the front and back axis.
- Use a whole punch to punch a hole on both sides of front and back for the pencils to go through. The holes should be half an inch above the bottom of the vehicle (box).
- Push the pencil ends firmly into the spools of thread.
A Second Look At Wheels & Axels
Take a closer look to examine the wheels on bikes, cars, wheel barrows to see how the wheels are connected to an axel. Also notice the wheel and axel on electric fans. They are all around us. Think: How well would society have progressed technologically without the wheel and axel?Pulley
Pulleys are another form of wheel, but these are used for lifting. You can buy kits for experimenting with pulleys, or buy the pulleys at a hardware store. If you don’t have any pulleys to experiment with, the simple demonstration below will show how pulleys help.Look for Pulleys
Here are some pulleys you may find in your house:- curtain rod
- window blinds
- shoe laces
- fishing pole
- toy cranes
A Pulley Demonstration
- Liquid laundry detergent bottle - needs to be filled for weight
- Bar - closet or swing set or pull-up bar
- Rope or string (stronger than yarn)
- Pick up the bottle and notice how heavy it is.
- Tie one end of rope to the bar. Thread the other end through the bottle handle and then over the bar again. The rope should be going down the backside of the bar.
- Now try lifting the bottle by pulling on the rope. It is easier.
- Loop the end of the rope through the bottle a second time, then back over the bar. It is even easier to lift.
- Loop it through the bottle and over the bar a third time. With each loop it takes less force to move the bottle.
Cartoon & Mathematical Explanation
A mathematical explaination is given on the following Youtube clip:- Mocomi Kids: What is A Pulley.
Inclined Plane
An inclined plane is a slanted surface that is used to lift objects. You have been using inclinded planes since you were a baby in a stroller. Literally. Explain the value of ramps for those with strollers, wheel chairs, or carts.Inclined Plane Demonstration: Large Materials
You will need:- A spring scale with hook
- A pile of books belted together
- Steps
- Board for inclined plane
- Toy car or small cart
Alternative Inclined Plane Demonstration: Small Materials
Use a small Match Box sized car and steps & inclined plane made out of books as an alternative for this demonstration.- Use the spring scale to find how much force is required to pull the books up the steps.
- Put the inclined plane over the steps. Now determine how much force was required to drag the books up the plane.
- Tie the books to a toy car or other wheel and axel. Now how much force is it when you combine simple machines?
Screw
A screw has spiral edges that rotate around a cyliner.These types of screws should be available to have your students identify:
- key ring
- light bulb
- jar lid
- large and small screws
- Take a sheet of paper (8 1/2 X 11 inches)
- Cut in half the short way (it will be 4 1/4 inches X 11 inches)
- Draw a line from one corner to the opposite corner to divide it into two triangles. Cut on the line so you have the 2 triangles.
- Look at one of the triangles with the long flat side down on a table top. Notice that it forms an inclined plane.
- Lay a pencil along the short edge. Tape it in place.
- Now roll the pencil so the paper triangle wraps around it.
- When you are done, you will see the familiar screw shape or barber shop pole spiral.
Looking for the 6 Simple Machines
Of course, the car has some very complicated computerized and motorized parts; but much of it is based on the six simple machines. From seat belts to mirrors to opening the door, see if you can find the different machines in operation next time you climb into the family car.Materials to Teach 6 Simple Machines
Kits to Teach All 6 Machines
Learning Resources has a $40 simple machines kit of high quality, durable materials that are not realistic looking. Great for co-ops and small groups like scouts.Thames & Kosmos has a $10 to $12 kit of all six machines made out of flimsy materials and a homemade spring scale you make from a water bottle. It gets the point across, but requires parental help to make sense of the directions and an extra set of hands to prevent things from breaking. The savings in money is spent in time required to understand the directions. But it is the only one that allows the students to calculate the savings in force applied.
Supplies to Each Individual Machines
Spring Scale
A spring scale for $10 or under can help you measure the reduction in force when using wheel & axel, pulleys, and inclined plane. It is harder to use to measure the other 3 easily.Lego Kits: Wheel & Axel
Lego or knex kits for wheel and axels can be $5 to $100.Pulleys
Real pulleys or kids science kits of plastic pulleys can be used. The kits may be better if you are not familiar with the use of pulleys but are generally cheaper quality.MatchCard Science
How To Use MatchCards
Download the FREE MatchCard Science Instructor's Guide and see how MatchCards can make building their science knowledge base fun.
Force & Motion Unit Study

It will take four to six weeks to complete the seven objectives in this Unit Study.
Download the entire Force And Motion Unit Study.
12 Science Unit Studies
Chemistry is only one of twelve complete unit studies for kids in 3rd to 8th grade.
Comprehensive objectives, hands-on projects, suggested science fair experiments, and the fun game-like MatchCards keep them interested in learning science. See all twelve MatchCard Science Unit Studies.
Ready To Use Resources


About Our Site
Hands-On Learning